Category: Science


Science Lab: Dissecting Flowers

By Mariah Bruehl,

Playful Learning: Dissecting Flowers

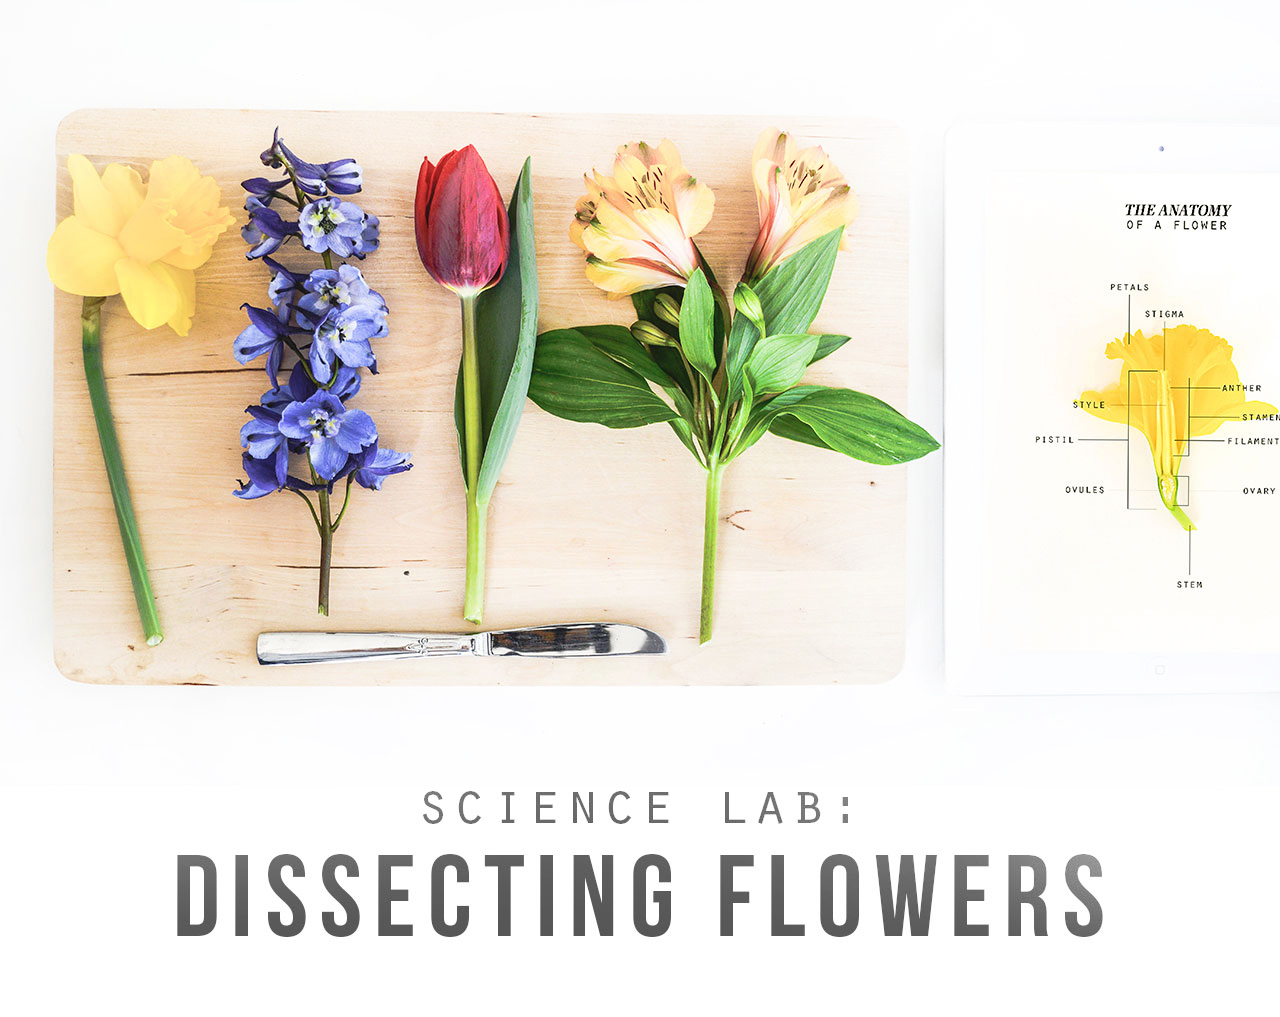
I will never forget the unexpected delight I felt when my college botany professor announced that we would be dissecting flowers in class. The fact that I had appreciated flowers for so many years without ever knowing what was going on inside of them was eye-opening for me. By taking the time to slow down and dig a bit deeper, I discovered a whole new world—the inner workings of a flower.

Isn’t that what we all want? To be pleasantly surprised by a new discovery, to experience the awe and sense of wonder for all the universe has to offer? To feel that there is something bigger and greater than ourselves at work in the world?

Go ahead, give it a try!


Vocabulary

  • Eco-System
  • Petal – outer sections of the flower
  • Stem – main stalk of the plant
  • Pistil – part of the flower that produces seeds
  • Stigma – sticky part at the top of the pistil that catches the pollen
  • Style – long part of the pistil between the stigma and the ovary
  • Stamen – part of the flower that produces pollen
  • Filament – part of the stamen that supports the anther
  • Anther – part at the top of the stamen that produces the pollen
  • Ovary – large part of the pistil that produces the ovules
  • Ovules – when the ovules are fertilized by pollen, they become the seeds
  • Spathe – thin sheath that protects the flower buds

Materials

  • Cutting Board
  • Flowers
  • Child-Safe Knife or Scissors
  • Printables (see below)
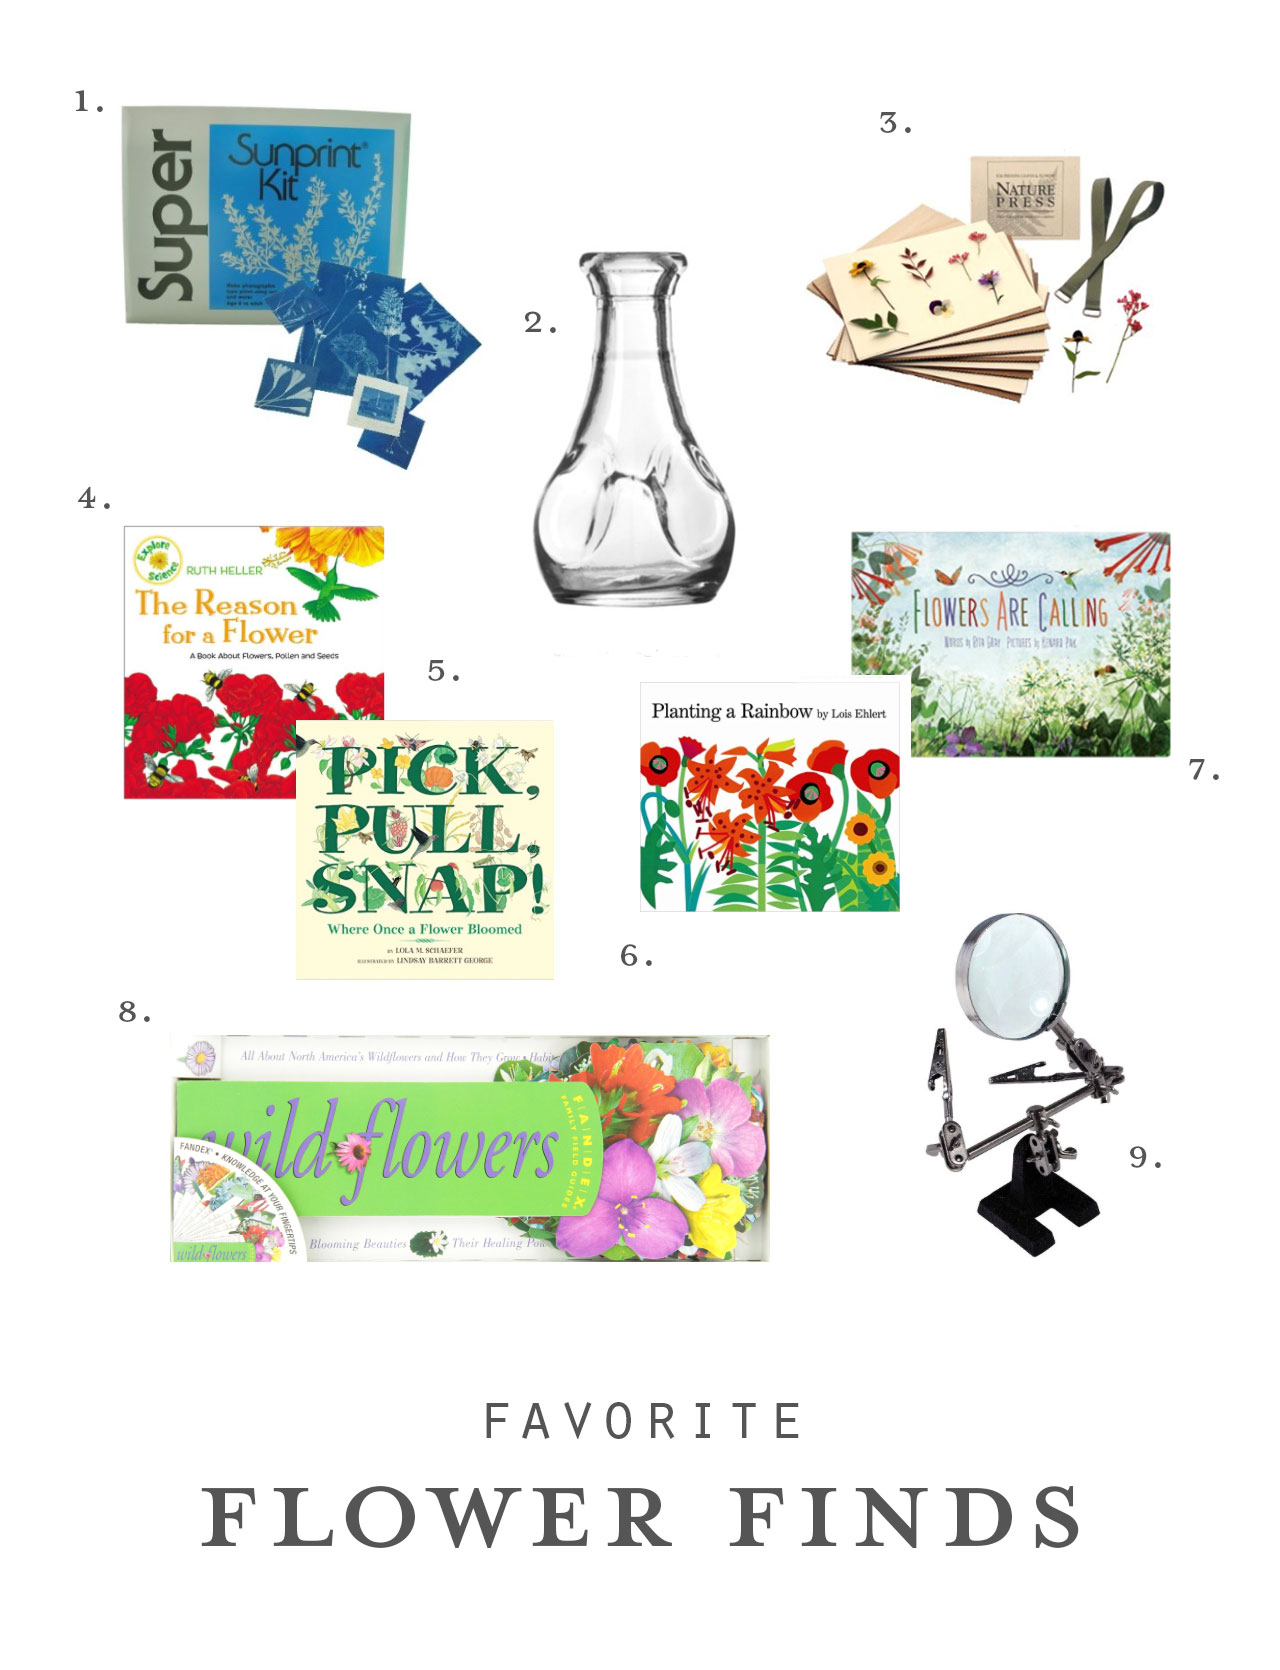
Resources

Book Love

  1. The Reason for a Flower by Ruth Heller – This is our go-to book for using when we dissect flowers. It has lovely illustrations that explain the parts and functions of all the parts of a flower.
  2. Pick, Pull, Snap!: Where Once a Flower Bloomed by Lola M. Schaefer – This is a lovely picture book that describes in simple terms the process by which plants flower, create seeds, and bear fruit.
  3. Flowers are Calling by Rita Gray – This beautifully illustrated book shows us the marvel of natural cooperation between plants, animals, and insects as they each play their part in the forest’s cycle of life.

Make sure to check out more of our favorite flower finds, here.
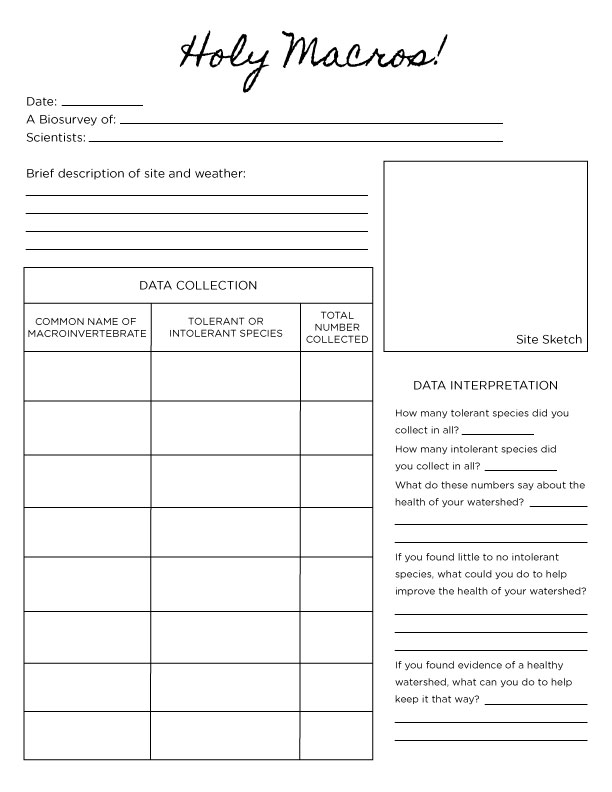
Printables

* This post contains Amazon Affiliate links.

Favorite Flower Finds

By Mariah Bruehl,

FavoriteFlowerFinds1. / 2. / 3. / 4. / 5. / 6. / 7. / 8. / 9.

When the crocuses makes their first appearance in early spring it opens our senses to all of the potential the season holds. Forsythia begins to make its presence known, and the daffodils and tulips follow suit on all of their splendor. It’s the perfect time to explore the wonderful world of flowers!

For this reason we have compiled all of our favorite flower finds…

  1. Sunprint Kit – If you’ve never made a sunprint, it’s time to jump in! They’re the prefect way to create a lasting impression of the the flowers you collect.
  2. Mini Bud Vases – These mini vases are wonderful for having around the house for all of the little flower finds you discover on neighborhood walks and in your own backyard. This set is great for flower arranging—why not put one in every room!
  3. Flower and Leaf Press – Having a leaf and flower press is an essential for creating an endless supply of beautiful art materials for making handmade cards, book marks, frames and more!
  4. The Reason for a Flower by Ruth Heller – This is our go-to book for using when we dissect flowers. It has lovely illustrations that explain the parts and functions of all the parts of a flower.
  5. Pick, Pull, Snap!: Where Once a Flower Bloomed by Lola M. Schaefer – This is a lovely picture book that describes in simple terms the process by which plants flower, create seeds, and bear fruit.
  6. Planting a Rainbow by Louis Elhert – Louis Ehlert is one of our favorite authors and this book describes how to plant bulbs, seeds, and seedlings, and nurture their growth. It also helps young children identify a variety of springtime flowers.
  7. Flowers are Calling by Rita Gray – This beautifully illustrated book shows us the marvel of natural cooperation between plants, animals, and insects as they each play their part in the forest’s cycle of life.
  8. Wildflower Fandex – This visually stunning fan, full of common wildflowers is perfect for bringing along on an outdoor adventures. It’s sure to captivate!
  9. Helping Hand Magnifying Glass – This handy magnifying glass is the perfect way to take a closer look as you begin to discover the different parts of a flower.

Put all of these inspiring materials to good use and try dissecting a flower. It’s an amazing experience!


*This post contains Amazon Affiliate links.

Look Closely: The Art of Observation

By Mariah Bruehl,

Look Closely: The Art of Observation

Now that spring is here, it’s time to start exploring the great outdoors!

Developing the art of observation is an essential skill for our young backyard naturalists… Focusing observations on one small square of space, encourages your children to take more time and look more closely at what they might ordinarily walk right by. By choosing one specific area to explore children can begin to see the relationships between the different discoveries they make.

Print out two copies of the Look Closely printable. Cut out the square on your first copy. Bring both outside along with a magnifying glass and some colored pencils and find an interesting place to study. Sketch what you see in your square. Now dig around a little and see what you can discover underneath the ground.

Take some time to think about these questions…

  • Did you discover anything that surprised you in your small square?
  • How are the items you discovered connected?
  • Why are they located in the same space?
  • What stood out to you most?

Now that you have your square assembled you can take it on the road. Use it to check out different eco-systems such as a local pond, the forest floor, or the seashore. Compare and contrast you findings.


Printables

Life Cycle of a Seed

By Mariah Bruehl,

Playful Learning: Life Cycle of a Seed

Watching a simple bean seed sprout offers children the opportunity to observe and document change over time. As the bean goes through its changes, children can witness the life cycle of a plant and identify the various parts as they unfold before their very eyes.

Materials

  • Bean Seeds
  • Clear glass jar
  • Paper Towels
  • Spray bottle with water
  • Parts of a Bean Seed (sign-up for our newsletter below)

The Process

No matter how many times I do this activity, whether it is with toddlers or grown-ups, I am always in awe of the power and determination of the seed to bring forth new life. Witnessing the process of the radicle breaking through the seed coat, taking root and flourishing gives you the opportunity to explore the cycle of life with your children.

  1. Start by gathering a handful of cotton balls and insert them into your glass jar. Make sure that there are enough cotton balls to place sufficient pressure on the side of the jar to hold up a bean seed.
  2. Place one to three bean seeds between the glass of your jar and the cotton balls, leaving enough space for them to grow.
  3. Use your spray bottle to dampen the cotton balls.
  4. Place the jar in a sunny spot and watch nature take its course!

You can add a valuable dimension to this experience by simultaneously planting the same bean seeds in a garden or container. As children watch their garden grow, the bean seed in the jar offers a behind the scenes look at what is happening under the soil. It is also wonderful for children to experience the process of growing something from seed and seeing it through until it reaches the dinner table.

Some helpful vocabulary terms that can be introduced as each part of the bean plant presents itself are:

  • Seed Coat – Outer layer that protects the seed
  • Cotyledon – Part of the seed that stores food for early growth
  • Hypocotyl – Helps to push the first leaves above ground and becomes part of the stem.
  • First True Leaves – The first leaves to emerge from the seedling and the beginning of photosynthesis for the plant
  • Primary Root – The first root to emerge from the seedling. The primary root grows downward. The functions of both the primary and secondary roots are to anchor the plant to the ground, to absorb water and minerals from the soil and to store food.
  • Secondary Roots – Secondary roots emerge after the primary root and grow out to the sides.

Books to Inspire


Printables


SaveSave

Simple Keys for Identifying Conifers: The Pine Family

By Mariah Bruehl,

leadphoto-conifers

Have you ever given much consideration to the various pine trees around you?  My children and I have been slowly identifying the deciduous trees in our neighborhood and can now identify a few during the winter by the buds that develop in late summer.  But it wasn’t until recently that we set on a quest to learn more about the many conifers we see every day.  We quickly learned that what we generally call a pine may not be just a pine.  If you would like to investigate the conifers of the pine family with your child, we have some simple keys that will help you distinguish them.

pineclose

What exactly is a conifer?
Conifer stems from Latin and means “cone bearer”.  There are seven different families of conifers, all of which bear cones.  With a some exceptions, most conifer trees are evergreens that maintain their color and leaves throughout the year.  They are easily identified by their needle-like or scaly leaves.

For simplicity, let’s focus specifically on evergreen trees of the pine family…

Who’s in the pine family (Pinaceae)?
This family of conifers include pines, spruces, firs, hemlocks, larches (these are not evergreens), and true cedars.  Members of the pine family have needles as opposed to scaly leaves.  Spruce, fir, and hemlock needles grow singularly on the branch.  The needles of pine trees grow in bundles of 2, 3, or 5.  True cedars have clusters of 15 or more needles and, although some species have been naturalized in North America, they are native to the Middle and Far East.

How to tell them apart
Remember that the needles of pines grow in clusters of 2 or more.

To distinguish between spruces and firs, all you have to do is “shake hands” with the tree.  Spruces can be stand-offish because their needles are pointed and sharp.  They are also usually square in cross-section, making it easy to roll between your fingers.  Fir trees are much friendlier.  Their needles are softer and flat, which cannot be rolled between your fingers.  You can give this mnemonic a try to help your child remember: spruces are stiff and sharp, firs are flexible and friendly.

guide_pines

You can find more keys to help you identify these conifers on our flash card download.  Print them on card stock or laminate them to bring them with you on your next walk or hike and see how many of the trees can you identify.

You may also find these resources helpful:

coniferflash

flash card photo sources- spruce coneeastern white pine conefir cones

Mystery Bags for Older Children

By Mariah Bruehl,

Mystery Bag TitleMystery bags (bags in which you put items for a child to identify by sense of touch only) are commonly used with children in the three to eight year age range and are a fun, engaging way for children to sharpen their tactile perception.  It’s a classic activity that you perhaps have done many times with your child.  I certainly have with all three of mine and one thing I noticed is that no matter what their age, they can’t resist the intrigue of a mystery!  But how can you continue the fun while still providing a challenge for older children?

Here are some twists to give a try…


What’s in Common

(classification, problem-solving)

Choose items for the mystery bag that all have one thing in common.  It could be items with a similar purpose or that you might use for a particular activity (art, cooking, reading, getting reading for bed, swimming, etc), items that share the same beginning or ending sound, or anything else you can come up with.  Ask your child to visualize each item as he feels it and to say what it is.  Ask him to tell you as soon as he thinks he’s knows what each item has in common.

To make it a bit more challenging, choose items that can also be categorized into sub-sets.  For example, the objects might fall in the category of “toys” but can be further divided into animals, wooden toys, and vehicles.  This can be a fun way to introduce a new unit study or skill.


Inference

(critical thinking, reasoning)

Inference is the skill of reaching a conclusion using observation, prior knowledge, and reasoning.  It is considered a foundational skill that is used across the curriculum, especially in reading and science.
To prepare an inference mystery bag, gather items that tell a story about a person (interests, occupation, etc.), a place, or a situation.

For example, you might pretend that you are meeting your sister’s friend for the first time and, so that you can learn a little about her first, your sister has given you a bag of some of her belongings for clues.   What kinds of things might she do or like?  Does she have children or a pet?  Or maybe a neighbor was telling you about the great vacation he just got back from and he’s brought you a bag of souvenirs from the trip.   Where did he go and what types of things did he do?  You can really have fun getting creative with this version!

In this variation, the child pulls out the items one at a time and makes his inference as to what information the object gives.  Ask your child questions about what he’s basing his reasoning on and if there are any other conclusions that could be considered.

Mystery Bag for Older Children

Touch Drawing

(tactile perception, observation, visualization)

Choose one object with an interesting form and texture but not too complex (something from nature is our favorite type of object to use) and place it in a bag that your child cannot see through.  Ask your child to reach in and feel the object without peeking.  Prompt him to think about it’s texture, size, and shape.  Is it smooth or rough?  Ridged?  Scaly?  Do all sides have the same texture?  Is it thin, long, pointy?  Is it soft or hard?  Once your child has enough information to be able to visualize the object it’s time to put pencil to paper and try to capture the object’s image in a drawing.  Allow your child to feel the object as many times as he wants while he draws but still no peeking.  The level of details that your child notices will support the accuracy of the drawing.  Once the drawing is complete your child may take the object out and compare it to the drawing.  Discuss the similarities and differences.

Mystery Bags for Older Children

Have fun with these variations!  And if you have other clever mystery bags activities, please do share.


Universal Lessons: The Solar System

By Mariah Bruehl,

Universal Lessons: The Solar System

Wow! What an amazing summer…

As many of you know we opened the Playful Learning Studio in June and I’m happy to report that our new space took on a life of its own… We spent the summer developing wonderful learning experiences and sharing them with local children in an inspiring learning environment.

And best of all for me, I was able to teach again, which felt like a homecoming in many ways…

So, as Playful Learning continues to evolve, you will hear more and more about what’s happening in our studio space. We like to think of it as a laboratory for learning. It’s an incredible opportunity to teach children in an optimal learning environment, using a highly personalized curriculum. Through this process, we are discovering new insights into the teaching and learning process as well as validating previous theories.

You can learn a lot about children when you put them in control of their own learning. The Playful Learning Studio offers enrichment programs where students can come and learn about anything they want. As we get to know each child, we create hands-on lessons in the areas they have expressed interest in exploring more deeply.

What’s most telling is that when you first invite a child to share some ideas of things they would like to learn about, they have a difficult time responding. It’s a new question for many of them and they often don’t know where to begin. Yet, with some thoughtful prompts (which I will share later) the ideas start to flow and authentic learning begins to take shape.

Through this process, one thing that struck me was the realization that certain topics seem to have a universal appeal to children of all ages. Learning about the Solar System was by far one of the topics children seemed most inspired by, so I thought it would be fun to share one of our most tried and true lessons of the summer.

Playful Learning: The Solar System
Click on image to print.

We start by reading the book, What’s Out There? A Book About Space  by Lynn Wilson. I love this book because it captures the attention of even the youngest readers, has interesting yet simple explanations, and prompts lots of good conversation.

After reading, comes the invitation to create the planets out of Sculpey modeling clay. This medium is perfect for strengthening little hands and comes in vibrant colors that can be blended together to create the perfect model of each planet. It’s fun to bake them afterwards and glue each one to the blank printout below.

Playful Learning: Solar System II
Click on image to print.

Of course, adding in online image searches for photos of each planet, as it is being created, adds to the magic of it all! It’s the perfect way to model creative and productive use of technology!


Playful Learning: The Solar System

This activity is the perfect springboard into other lessons on astronomy, phases of the moon, and more… Let your child lead the way.

*This post contains affiliate links.

Nature Study: Getting Up Close

By Mariah Bruehl,

Nature Study: Getting Up CloseNature is all around us, from the grass that grows between the paving stones near our house to a nearby wooded copse, ripe for exploring.  But how often do we really look closely at the nature that surrounds us, I mean really look.   

It can be easy to think of Nature Study as a thing separate from our lives, a subject like Maths or Spanish; but really nature is a part of us, and studying it should be a simple matter of taking a moment to really look and connect.

Though we love science in our house, I was having a hard time getting to grips with regular nature studies.  I felt that it had to be a beautiful journal slaved over for hours, or the study of field guides to an expert level.  Then I discovered a curriculum called Private Eye that encourages the simple study of the natural world that is all around us.   In order to see nature from a different angle (literally) the ‘student’ uses a 5x magnification jeweler’s loupe, giving them an entirely new perception of objects and organisms they have seen, but never appreciated.

Nature Study: Getting Up Close

While the book that describes the core concepts of the curriculum is wonderful, it really isn’t necessary to have it in order to benefit from this kind of nature study.  All you need is a loupe (available from the Private Eye website, or other science stores near you) and an ample supply of curiosity, something that most children definitely do not lack.  

We have used our loupes out in ‘the field’ (it was an actual field) as well as at home for all sorts of studies.  Mostly I just encourage my boys to stop for a moment when they have found a new treasure, and take a minute to look at it again but through their loupes.  It’s amazing how astonished they are when they see an object through this new, closer perspective.  When looking through the loupe the rest of the world is cut off, allowing them to focus completely upon the newly revealed details the loupe offers up.  From an orange segment they had for snack, to a new snake skin found under the woodpile, they are always fascinated by what they see.  

Nature Study: Getting Up Close

The point of the Private Eye method is to draw analogies between different objects and organisms so that children begin to make connections and patterns.  Asking a few simple questions can help them to draw quite profound connections and help them understand how many of the building blocks of life are present throughout nature.  Ask the child what do you see?  and then, what does it remind you of?   They may notice the way the segment of orange has interconnected smaller segments, just as you might find on a snake skin.  You can wonder together at why that might be, or begin researching to find out!

Once your child has experienced the object up close you may wish to encourage them to draw what they saw.   Older children can write down words that come to mind and begin shaping a poem out of them (this video has some teaching tips and there are beautiful samples of work here).  

It’s truly lovely to produce a piece of art inspired by nature, something to treasure and hold on to.  But most of the time, when we grab our loupes from our nature basket to look at an unusual rock or a piece of wax from our beehives, we just look.  We look, we marvel, we tell each other what we see; and that, really that simple thing, is enough.  


Water is Water: 3 Experiments for Kids

By Mariah Bruehl,


Water is Water: 3 Experiments for KidsConfession number one, I am a sucker for the water cycle. I’m not sure what exactly entices me about this scientific phenomenon, perhaps because it is something children can see so readily in their own world, but it is something I have always loved teaching. Confession number two, I am even more entranced by picture books. A person’s age does not matter when it comes to picture books. They draw you in with their illustrations, and capture you with their words. Picture books are a simple, beautiful way to teach so many lessons, concrete and abstract. So, when I stumbled upon a new picture book about the water cycle, I may have done a little happy dance.

Water is Water by Miranda Paul uses short rhyming verse to follow water through phases throughout the seasons, states of matter, and the water cycle. The lovely illustrations by Jason Chin are a perfect accompaniment to the story. The icing on the cake is what follows the story, “More About Water”! The author provides a scientific background to each page of the story sprinkling in important vocabulary words.

As it says in the book, “Water moves and changes often – just like children!” The water cycle is a perfect scientific learning opportunity for some playful, active learning. Through the following three easy experiments, you can use a cup of water to show evaporation, condensation, and precipitation. These may be simple experiments, but connecting literature, science, and hands on discovery often gives a more concrete understanding of new concepts. Use the printable to help children delve deeper into their understanding through these connections.

You will only need a few readily available materials to complete all of these experiments:

  • Four cups
  • Water
  • Marker
  • Ice cube
  • Shaving cream
  • Food coloring

Water is Water: 3 Experiments for Kids

Start with evaporation. Place a full cup of water in front of a sunny window. Use a marker to make a line at the beginning water level. Each hour mark the water level and begin to look for changes. As the sun heats the water, it should begin to evaporate. This experiment requires some patience, so while waiting, it is a great time to move on to the next two experiments.

Water is Water: 3 Experiments for Kids

After evaporation we have condensation. When the water vapor reaches the sky it cools to form clouds. Fill a cup approximately two-thirds full of hot water. Take another cup, flip it upside down, and place it on top of the cup with hot water. Then place an ice cube on top of the upside down cup. Condensation will begin to form at the top of the upside down cup, just like a cloud.

Water is Water: 3 Experiments for Kids

Finally, a precipitation experiment. Again, fill a cup almost full with water. On top spray shaving cream as clouds. Then, squirt several drops of food coloring on top of the shaving cream. As the “cloud” becomes heavy, the food coloring will “rain” into the cup.

Once you have read the book and completed all three experiments, use the printable to help children make the connections between the book, what they see in their own lives, and what they viewed in the experiments (click on photo below to print).

WaterisWaterPrintable

If you are looking to extend your activities, there are abundant resources in books and online covering the water cycle. Here are a video, a website, and an app all about the water cycle. You may just find yourself as hooked on the water cycle as I am!

Water Cycle Video

Water Cycle Website

Water Cycle App


The Power of Here: Discover Your Local Watershed

By Mariah Bruehl,

The Power of Here: Discover Your Local Watershed
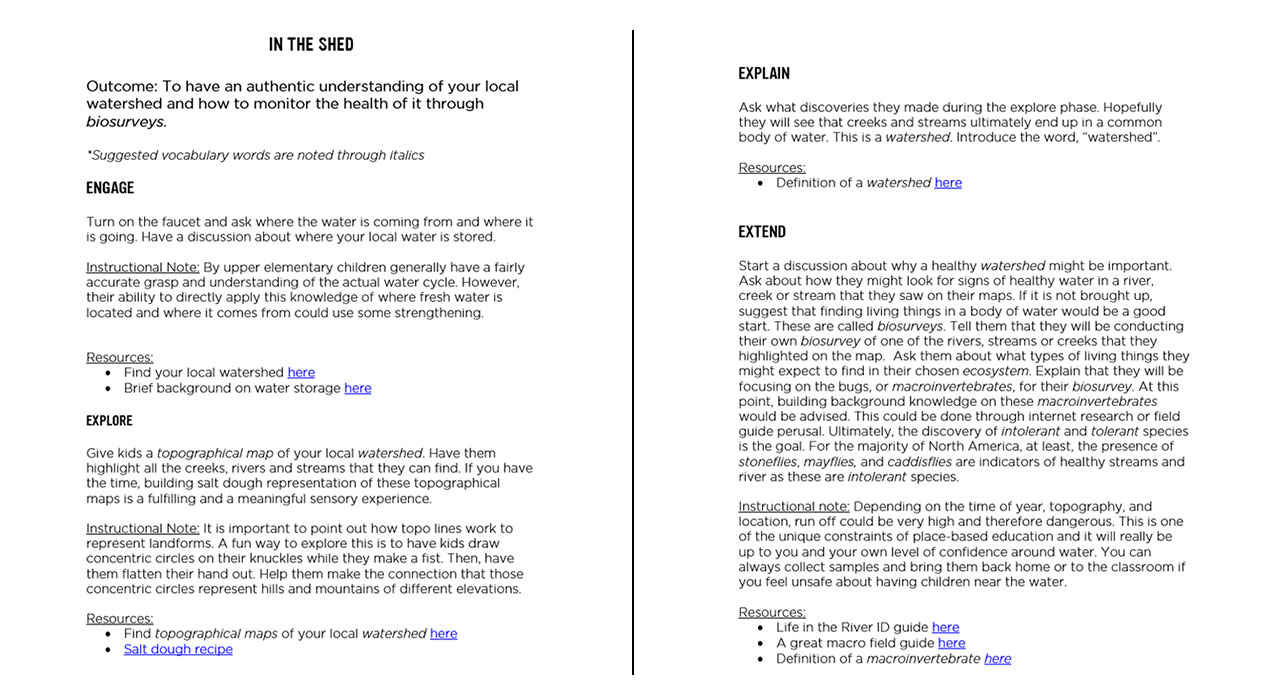
Place-based education has been around for quite some time. However, it is gaining momentum in the public education sector as educators have discovered the high levels of engagement and the inevitable adoption of The Next Generation Science Standards across states. The philosophy behind place-based education is that if children are introduced to various topics in a specific and personal space such as their own community, they can then apply their knowledge later in life to the larger global macrocosm. It is fairly straight forward, and in that simplicity lies the genius.

As the Next Generation Science Standards begin to dictate states’ curriculum, educators are finding themselves scouring resources to make their own science instruction more rigorous, engaging and ultimately rooted in the ideas of citizen science. The NGSS calls for a closer examination of human impact and interaction with the environment across all grade levels. This is both an exciting and daunting task. At least in the elementary years, I would argue that a place-based curriculum is going to give schools the biggest bang for the buck. It does require a lot of planning, coordination with local agencies, and study of content knowledge on the teacher’s part. However, it is within those hours of research, emails and phone calls that the teacher begins to own the lessons. But, what if everyone were to get involved in this process. The best part of teaching is the learning, and this joy should not belong to classroom teachers, alone. Place-based education can be led by anyone who lives in a…place!

Below is an idea for adults with children in the upper elementary grades that elicits learning about the health of local watersheds (click on photo below to download lesson).

InTheShed2


And here’s a worksheet to record your findings (click on photo to download):

holymacros!-1