Category: Math


DIY Ladybug Dice Game

By Mariah Bruehl,

DIY Ladybug Dice Game

Joey from Made by Joey is with us today to share an engaging math game for the whole family…

I love ladybugs, so I created our own version of the British party game – “Beetle“.  A game that my mother-in-law played as a child and taught to our family.

Perfect to play in the backyard, at the beach or in a restaurant.  It’s an excellent way to start little ones counting or a fun game to add to your curriculum if you are studying bugs!  Ages: 4 to 104!

Object of the game:

To complete 6 ladybug drawings before the other players.

**note:  younger children may prefer to play until 1 ladybug is complete to shorten the game.

DIY Ladybug Dice Game

Game pieces:

1 six-sided die

paper

pencil

printer (or you can draw out the sheets yourself)

DIY Ladybug Dice Game

Prior to playing, you can decorate your playing sheet with stamps and ink or your own ladybug drawings!

How to play:

– Download and print a playing sheet for each player.

– Download and print the ladybug rules sheet.

– The youngest player goes first.

– The first player rolls the die, counts the number on the die and, if they are able to do so, draws the body part that matches the number on the rules sheet.

DIY Ladybug Dice Game

– You must roll the numbers in order starting with 1 for the body, 2 for the stripe, etc.  (for example:  if you roll a 5 you cannot draw the legs until your ladybug has a body, stripe, head and antennae)

DIY Ladybug Dice Game

– If you roll another 1 before completing your previous ladybug then you can start drawing another ladybug and adding the body parts in order as you roll them.  You can, therefore, have several ladybugs at different stages of completion.

– Continue to follow the rules sheet diagram to eventually draw all of the body parts on each ladybug.

DIY Ladybug Dice Game

– Complete all 6 ladybugs to win the game!

Now you can make your own games!

Does your family have another idea for an object that could be made into a new version of this game?

Enjoy using our printables or have fun designing your own object to draw.  Any object that can be drawn in 6 steps will work!

Here are some titles of ladybug counting books to add to the fun!  Enjoy!

1. Ten Little Ladybugs by Melanie Gerth

2. Lots of Ladybugs by Michael Dahl

3. Counting Ladybugs 1-2-3 by Brian Enslow

4. Five Little Ladybugs by Karyn Henley

Twelve Books about Numbers

By Mariah Bruehl,

12 Books about Numbers

Rebecca from Thirteen Red Shoes is with us today to share another a lovely list of recommendations for counting books…

My eldest is able to count confidently, but my littlest, aged 2, is just developing this skill…

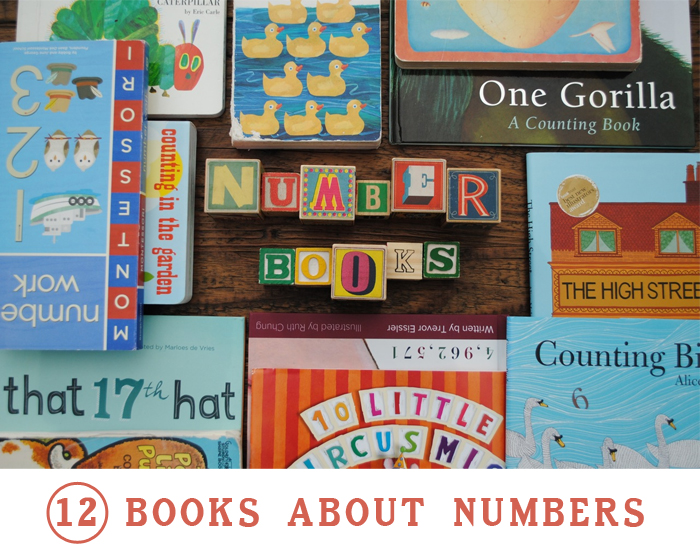
Here is a list of our favorite counting books, ranging from timeless classics to newly released books.

1. The Very Hungry Caterpillar | Eric Carle

We have multiple copies of this book! It is perfect for so many different areas of mathematics, be it numbers, time, color, repetition, pattern, science and life cycles.  It is a beautiful book and Eric Carle’s clever and signature collage artwork inspires children all over the world.

2. Counting in the Garden | Patrick and Emily Hruby

A delightful counting book in which you can extend in so many different ways.  When I read this book, we usually focus on sequential adding of the numbers, as well as cumulative adding.  Therefore we count not only 1 onion then two turnips and three thistles as we find the hidden garden items on each page, but we also add them together,so one onion + two turnips = three vegetables.  One onion, + two turnips + three thistles = 6 items hiding in the garden.

3. 10 Little Rubber Ducks | Eric Carle

A perfect book for introducing ordinal numbers as you follow the path of ten little rubber ducks as they are washed overboard a container ship during a storm.

4. The Poky Little Puppy | Jean Chandler

This book was mine as a child. When I had my first little boy, my parents gave this to me to read with him.  A lovely counting book from 1 – 10.

5. A Child’s First 1 2 3 Numbers | Alison Jay

I am a fan of the beautiful illustration style of Alison Jay.  Each page in this counting primer contains a little bit of the page before and a little bit of the page to come hidden in the picture.  I adore looking for the little link. Alison also cleverly represents the number in focus again and again on the page.  For example, in the three little pigs page, not only do we see three pigs, but they are accompanied by three tea cups and saucers, three apples, three umbrellas, three cushions, three cupcakes and the list goes on.  It is a fun gave to play with the littles-seeing who can find another representation of the given number.

6. & 7. The High Street | Alice Melvin and Counting Birds | Alice Melvin

Alice Melvin’s artwork is simply precious and her books are adorable.

My little ones love Counting Birds.  This rhyming primer introduces a lot of different birds we were not familiar with, as well as focusing on numerals from 1 – 20.

The High Street is a counting book, but also focuses on memory and list making. The main character, Sally, goes to the High Street to buy an eclectic list of items ranging from a Persian rug to a cockatoo.  The pages open up to become a three page spread and it is simply beautiful. You could spend an entire afternoon looking at the beautiful details on each page. My little ones love books with additional little pockets and flaps and pop ups so The High Street is a favorite.

8. One Gorilla A Counting Book | Anthony Browne

This book is magical. The illustrations alone are worth seeking out.  This is Anthony Browne at his very best.  Our youngest (aged 2) adores this book and enjoys telling us who the primates are on each page.  It would be wonderful to use as a provocation into a discussion on primates as the 10 representations are amazing and varied.

9. & 10. That 17th Hat | Trevor Eissler and Marloes de Vries and 4, 963, 571 | Trevor Eissler and Ruth Chung

June books, the publishing house of the above titles, state on their website that they ‘aim to delight and inspire children, while introducing families to Montessori education. They create books that honor children and the important work they naturally undertake in the demanding task of self-development.’

“That 17th Hat” and “4, 962, 571” are both strongly based in numbers and are perfect for children with a more concrete understanding of numbers.  “4,962,571” is an excellent starting point for discussion about larger numbers and how to record them.

Both feature end pages which guide parents through the core Montessori principles addressed in the picture books.  This video shares both titles being read by the author.

11. 10 Little Circus Mice | Caroline Stills and Judith Rossell

A delightful tale of mice teaching the friends of ten.  Friends of ten being 10 + 0, 9 + 1, 8 + 2, 7 + 3, 6 + 4, 5 + 5, 4 + 6, 3 + 7, 2 + 8, 1 + 9, 0 + 10 .

12. Montessori Number Work | June and Bobby George

This book allows the reader to experience numbers in multiple ways. Not only can you count the numbers as quantities, but there are also sandpaper numerals to trace to help reinforce number formation.


Learning with Circles

By Mariah Bruehl,

Learning with Circles

Joey from Made by Joey is with us today to share lots of inviting ways to engage our young mathematicians in meaningful and educational activities…

I just love it when art and learning go hand in hand!  We have several of Ed Emberley’s drawing books, so when I saw the books “Picture Pie” and “Picture Pie 2“, I thought-what a great way of introducing all kinds of learning!  Being a paper saver, I also love any opportunity to use up the small scraps of papers that we accumulate!

There are so many ways of using the activities in these books depending on your child’s age and abilities…

Learning with Circles

For early learners:

Adults can help children cut circles and shapes in a variety of sizes and colors.  Matching colors and shapes is an excellent way of starting the first step of recognition.  Finding other circles (and parts of circles) in your home or drawing pictures of items is another way to  help your child recognize circles.  Have  your child watch you arrange the shapes and ask “What have I made with these shapes?”

*note:  with young children always be cautious of choking hazards when collecting things for these activities.

Learning with Circles

For preschoolers/kinders:

With supervision, preschoolers/kinders can begin to trace/cut their own circles with child safe scissors, draw circles on paper and find items around the house or classroom. (have them collect items in a basket like a scavenger hunt!)  Print the words: circle, half, quarter, third, whole, part, and divide on paper for the children to “read”.  Use the paper circles and shapes to make patterns (for example:  red circle, blue half, green quarter, red circle, blue half, green quarter)  Believe it or not, understanding patterns is a very  important step to learning math concepts in future grades.

Learning with Circles

For school aged children:

Children can begin to work more independently with the Picture Pie books by following the directions to make specific patterns.  Working with and understanding how to divide the circles into halves, quarters, etc. and then combining those parts can aid in learning division and fractions.  Hands on learning for these types of mathematical concepts are excellent as the children can see and manipulate the shapes themselves.

Learning with Circles

Supplies needed:

  • Circle punch (in a variety of sizes) *Note:  children can cut the circles by hand or you can print the “Picture Pie Parts” from Ed Emberley’s website.
  • scissors
  • glue stick (for some of the activities)

Learning with Circles

Printables to use:

On Ed Emberley’s website there are free printable booklets that are available to download here.  Each month offers different seasonal projects that use the Picture Pie method.

To print any of the projects into a handy little booklet:

:: select the project

:: click on the “printer icon”

::  select the “multiple” button

:: select “print on both sides of paper” and “flip on short edge”

:: select the “booklet” button

::  click print

Trim the pages down if you wish and round the corners (always a nice touch for children’s materials), staple down the spine and you are ready to start making art, learning and recycling!

Learning with Circles

I have also designed a few free printables that can be used for learning with different age groups.

*Note:  you may need to download the file from Google Docs in order to see all of the shapes on some of the documents.

Learning with Circles for Early Learners

Learning with Circles for Preschoolers

Learning with Circles for School aged children

DIY Lego Puzzles

By Mariah Bruehl,

DIY Lego Puzzles

Rebecca from ThirteenRedShoes is with us today and is sharing a wonderful project she recently discovered, which is great for hand-eye coordination and for inspiring the young builders in our lives.

Last year, I ran across this pin on Pinterest. It led to the most adorable idea by Kids Activities Blog, to create your own puzzles using Duplo blocks and photography!  There are so many amazing ideas on blogs today. I pin so many of them, but this was one that I really wanted to create and it was very quick and easy. I would say less than 20 minutes and you are away!

Here’s the idea: Use photos of various Duplo/Lego configurations as puzzle cards that children can recreate with their blocks at a later date.

DIY Lego Puzzles

DIY Lego Puzzles

Here’s how we did it:

  • The Duplo pieces were set up on a board we had painted to use as a neutral and uncluttered background.  A simple blanket or sheet of white paper could also work well, simply use what you have available.
  • The next step was to take photos from above as an aerial image or bird’s eye view.  I like to take all of my photos in spaces that are filled with natural light, but not necessarily bright sunlight.  Close to a large window or door is often ideal.
  • I made sure to change the colors and shapes of the Duplo pieces around so that there was a varying degree of difficulty in order to cater and differentiate for the ages and abilities of my boys (aged five and two).
  • Once I had a lovely little collection of images on my camera (it is very hard to stop once you start, so set yourself a time limit!), I uploaded to my computer and printed them out on my home printer.  You could also laminate your prints, print them on photo paper,  or even create a book, whatever suits you and your budget.
  • Little R was at school while we created this little provocation, so Little F helped to design some of the interesting Duplo creations himself.  If you have a little person around while doing this, it makes it so much more enjoyable! They get so much out of creating the image, seeing it on the screen, and finally seeing it printed out.  I aim to involve my children in these creating times as much as possible.
  • Once printed, place the puzzle cards on a  clipboard. Place a basket of the blocks used next to it in a lovely sunny spot, sit back and allow the littles to find the provocation, and enjoy.

DIY Lego Puzzles

You could use anything really for this activity, Duplo blocks are just a starting point.

You could take photos of:

  1. natural materials found in the garden such as: seed pods, petals, or leaves
  2. wooden blocks
  3. mini figs
  4. toy dinosaurs
  5. animal figurines
  6. rocks and crystals
  7. shells and sea glass

The possibilities are only limited by your imagination.


Times Table Fortune Tellers (with printable tally sheets)

By Mariah Bruehl,

Times Table Fortune Tellers. Printable Tally Sheet included!Joey from madebyjoey is with us today to share a fun way for children to master the multiplication facts. My girls love making these fortune tellers and I am sure that your children will too!

Practicing multiplication often seems repetitive to children, but it is beneficial to have these math facts mastered before entering the intermediate grades.

Paper fortune tellers have been around since the 1950’s and have been adapted in many ways for many different uses.  This game will help to determine which multiplication equations have been memorized and which still need review by using my printable tally sheets.

Here is how I made our multiplication fortune tellers (btw – kids can help make these too, coloring is optional):

Times Table Fortune Tellers. Printable Tally Sheet Included!

  1. Trim 12 sheets (8.5″x11″) of white paper into 8.5″ squares.
  2. Fold the square in half both ways to create 4 boxes.
  3. Lightly color each box a different color.
  4. Flip sheet over and fold each corner to the center.
  5. Flip sheet over again and fold corners to the center.

Now you have folded the paper into a fortune teller you can start writing the equations and hidden answers!

Times Table Fortune Tellers.

  • On the side with 4 colored squares write on each square one multiplication equation starting with (your number) x 1, up to (your number) x 4.  (in the example my number is 2)
  • Flip over and continue writing equations in the colored triangles from (your number) x 5 up to (your number) x 12.
  • Open each flap and write the answer.
  • Finally open up the fortune teller with the uncolored side facing up.  In each corner write the answer to the equation on each of the four colored squares.

Times Table Fortune Tellers.

Now it is ready to use!

Next print off my printable tally sheets.  I have trimmed and mounted ours onto extra water colour paintings. (a good way to reuse artwork!)  I then “laminated” the sheets by trimming a clear plastic page protector to create a sleeve for 2 tally sheets to slide in back to back.

Note:  If you know that your child has memorized some of the numbers then only make up the sheets that you need.

Times Table Fortune Tellers.

To play you will need:

  • fortune tellers
  • laminated tally sheets
  • non permanent felt pen
  • damp cloth to clean tally sheet

Game can be played with 1 or 2 players.  If playing with 2 players you may wish to make up 2 sets of tally sheets or have both players work together to complete all of the equations.

To play:

  • Teach child how to maneuver the fortune teller with their fingers.
  • Have Player A chose an equation from the closed fortune teller, Player A then answers the question and Player B verifies that they are correct by checking hidden answer.  If so, Player A writes the answer on the tally sheet next to the equation chosen and mark that it took 1 try to get the correct answer.  If they do not say the correct answer, they mark 1try but must try that equation again on another turn before they can fill in the correct answer.
  • Player B then maneuver the fortune teller with their fingers that number of times (ie:  2×2=4 times) which then reveals the inside of the fortune teller to Player 1.
  • Player A chooses another equation and answers the question.  Player B then lifts the flap to see if they have said the correct answer.  If so, Player A records the answer and the number of tries on the tally sheet.
  • Player A then passes the fortune teller to Player B and takes a turn.
  • Whether the Players are competing or working together the game is finished when all the answers have been filled in correctly.

When the tally sheet is complete it will be clear which equations need a bit more review if they required several tries to get the correct answer.  By concealing the answers on the fortune teller, it gives the child(ren) an opportunity to work independently and self correct their work.

Introduce one fortune teller at a time until the child feels confident that they are ready to try more.  They do not need to be introduced in any particular order although it is common to start with the 2’s, then the 3’s, 5’s,10’s, and 11’s as many find that they are the easiest to remember.

I hope that you and your child(ren) find this a helpful game that aids in learning the multiplication tables.  This project can also be revised to learn addition and subtraction equations.


Playful Math: Post-It Note Patterns

By Mariah Bruehl,

Playful Math: Post-It Note Patterns

If you’re anything like me, you’re always looking for rainy day activities to do with your children. I love it when we can find new things to do with what we already have around the house (especially if it really is raining outside!).

All you need to make these pretty post-it patterns are post-it notes (I recommend the “super sticky” kind) and a pattern key to follow. You can download the two we used here and here. Or, grab a sheet of graph paper and make your own picture! You could even make letters and numbers. I love how this activity seems like art, but secretly involves so many different areas of learning: color, counting, following a pattern, and hand-eye coordination skills.

Playful Math: Post-It Note Patterns

To make your post-it pattern, simply follow your pattern key. We made ours on the wall (for the purpose of photographing it), but it might be easier to make your shape on a hard floor surface, especially for younger kids. Start in the middle of your picture, each square represents one post-it note. My kids are fairly young (2 and 4), so I placed the post-it notes as we went, but they told me where they should go, according to our key. Even though they could see the final shape on the key, they were still amazed when the project was finished on the wall!

Playful Math: Post-It Note Patterns

If you’re worried about wasting paper, we were able to re-use the post-its after taking them off the wall. The girls played with them all afternoon, mostly making roads and trails on the floor leading to “treasure.”

Playful Math: Post-It Note Patterns