Category: All posts


Exploring Color + Color Mixing with Monoprinting

By Mariah Bruehl,

Once a month we participate in a Science Through Art workshop at the national science research center (CSIRO). They are amazing hands-on workshops where the children explore different topics through art. So far we have explored insects (through model making and block printing), dinosaurs (through clay modelling and painting), camouflage (through collage and drawing) and color.

One of the activities at the Colors workshop was exploring color mixing with monoprinting. I really liked this activity because Jack (4.5yrs) could work with color mixing while Sarah (2.5 yrs), still working with the same materials, could explore in a more sensory way.

Both of my children really enjoyed this activity. The roller proved especially satisfying and then the reveal as they peel the paper back; fascinating.

Exploring Color with Monoprinting

Here’s what you need for each child:

  • 2 smooth tiles. You might have some spare kitchen or bathroom tiles in the garage or shed which you could use. Otherwise try a local supplier for some sample tiles. Tiles are also wonderful for working with clay so it is good to have some on hand.
  • 2 small paint rollers
  • 2 containers for paint
  • cotton buds (cue tips)
  • paper

  • Lay out all your materials in a beautiful and inviting way making sure your child can easily reach everything
  • Using the roller, invite your child to roll paint onto a tile (one color for each tile)
  • Using the cotton bud, draw a design into the paint
  • Press the paper onto the tile and make a monoprint of your drawing
  • Take off the paper and see your design
  • Repeat the process with the other tile using the other color of paint
  • Now press the same piece of paper onto the second tile. The colors will mix creating the new color
  • Peel back the paper and see your design. Beautiful.

Exploring Color & Color Mixing with Monoprinting

At the workshop, the teacher read the children Little Blue and Little Yellow by Leo Lionni.

I hadn’t seen this book before. It was a sweet story about two friends, Little Blue and Little Yellow and how one day after losing each other for a short period, they hug until the two blobby paint friends turn green.

It’s also a nice story about friendship and acceptance. Have a look for it at the library next time you’re there.

Monoprinting


SaveSave

Picture Book Project: The Dot

By Mariah Bruehl,

 Picture Book Project: The Dot

Rebecca from Thirteen Red Shoes is with us to share some creative project ideas for one of our favorite children’s books, The Dot by Peter H. Reynolds.

I often encourage and nourish the notion of individuality and uniqueness in my children and by chance this week I stumbled upon a delightful picture book to assist in this process.

Have you ever read the book The Dot? The book by Peter H. Reynolds is about a little girl on a journey to discover her self worth and that she does have a talent to offer the world. Sometimes a little praise and encouragement is all that is required.

Here is a link to the story The Dot on You Tube and the book is available here or at your local boutique bookstore or local library. I shared the story with my littles and it opened the door to so many delightful activities. I would actually like to create a version of this video featuring my littles reading the book together with our dot art as the accompanying images. I think this would be a delightful gift for Grandparents or even for a class to do at school.

Here are some activities I plan on doing based on book. Do you care to join in? Do you have any ideas to add?

  • Set out a morning provocation of water color paints and ask your littles to create their own dot masterpiece.  Present paper in a variety of sizes, textures and colors.
  • Set up a space outside with chalk for dots to be created.  Capture these moments of playful learning with your camera. Print out the images and make cards to send to family (send as an email or  make a virtual card with an app, such as RedStamp).
  • Create a family piece of dot art on a large canvas.
  • Encourage your children to make their own dot gallery.  Invite family and friends over and host a dot exhibition selling your children’s art to family and friends to raise money for a charity.  Prices could be as little as $2. Maybe even a silent auction could take place?
  • Search for dots in nature and take photos or go for a walk in the city and capture city circles.

The littles and I created some adorable silk screen printed dots.  The process is long when using a silk screen as you need have patience and wait for each layer to dry before you can add another dot, however it is a lovely activity to have going throughout the day, adding to every now and then.

Picture Book Project: The Dot

If you’re looking for some Dot-Art inspiration, check out the work of Rachel Castle here.

You can also check out an interview with the author, Peter H. Reynolds, here.

Child’s Play: The Art of Toy Rotation

By Mariah Bruehl,

Child's Play: The Art of Toy Rotation

An avalanche of toys invites emotional disconnect and a sense of overwhelm.

– Dr. Kim John Payne

To rotate: to replace, usually according to a schedule or plan.

Rotating is one of the easiest ways to deal with toy overload and is hands down my favorite. In my previous posts I mentioned it already, but today let’s take a closer look. You will see it’s no rocket science as we go through 8 easy steps.

Foremost, let me give you a list of the main reasons you will love it:

  1. Inventiveness and fantasy blooms
  2. Clean up time becomes a breeze
  3. Less toys out equals more and deeper engagement
  4. Siblings fight less
  5. Everyday objects are reinvented and turned into toys
  6. Overstimulation is easier to avoid
  7. Children learn to play on their own
  8. Toys are used in new ways
  9. Teaches independence
  10. You are better prepared for birthdays and holidays
Child's Play: The Art of Toy Rotation

One evening after my son’s second birthday I looked around the living room and felt slightly uncomfortable. The room is our main play area where he has a long shelf and two drawers for his toys. Nonetheless, trucks and trains were scattered everywhere, taking up more and more floor space. On opening a drawer, heaps of toys, untouched for weeks jumped up at me. I took a deep breath and instead of some well deserved “me time,” I immediately transported some of it to the basement.

Months passed and although we were still happy with this basic approach I realized that in order to fully enjoy all the amazing benefits I could take this to the next level.

Let me explain how it is both simple and effective:

To make it easier to understand, we will prepare 4 boxes of toys which you can rotate every 2 weeks. I encourage you to customize this method until it suits you and your family’s lifestyle. You can try with only 3 boxes, or you can rotate more frequently. If you have more children you can do mixed or different boxes per child.

Child's Play: The Art of Toy Rotation


The steps are as follows:


Step 1: Corral

Put all of the toys in one room If this sounds too overwhelming, go room by room through all the steps


Step 2: Decide

Decide what to keep and what to get rid of? No need to rotate that 3 legged horse or incomplete puzzle

What can be left out permanently (Lego, certain fave toys)?


Step 3: Divide

Divide all the “rotating” toys into 3 main categories:

  1. Thinking toys: they target cognitive development and fine motor development (puzzles, board games)
  2. Moving toys: they target gross motor movements (balls, cars)
  3. Pretending toys: they target social/emotional development and language development (dolls, Lego)

*You can find more great info on these categories here.


Step 4: Record

Record the name of each toy/or set by category. Preferably each category on a different piece of paper, leaving plenty of space for notes and ideas. As you wrap up a 2 week period you can jot down your remarks, which toys they played with and what they are into at the moment. Taking stock will not only provide you with valuable information for when you go shopping for presents, you will also have a wonderful notebook full of memories at the end of the year.


Step 5: Form

Form four groups in each category. Try to make each group equally engaging. This step will show you were there is lack or excess so don’t forget to jot down your insights.

Hint: you can even show it to grandparents/aunts to help them decide what is needed and what not. Xmas is not that far away…


Step 6: Prepare

Prepare four boxes and put one group of every category in them. This way you will have in each rotation some thinking toys, some moving toys and some pretending toys.


Step 7: Store

Store the three out of sight boxes. Be aware that easy access is key if you want to keep up the good habit—garage, playroom or under your bed doesn’t really matter as long as your little ones can’t reach them.


Step 7: Display

Display the toys from the left out box as welcoming and exciting as you can in baskets and on their shelves. Spice it up with their artwork and books and tad-ah(!) you are set for 2 weeks!


Step 8: Rotate

Change out toys every two weeks.

Child's Play: The Art of Toy Organization


If you’d like you can write down 5 toys that you noticed your children haven’t played with for a while in the comments below. Promise me, this evening when you clear away the toys, to put those five toys neatly out of reach. Remember this is exactly how I started!

Also, here are a few helpful links about toy rotation from around the web:


Try One of Our Workshops…

[ubergrid id=24468]

Peaceable Home: Aromatherapy Pillow Spray

By Mariah Bruehl,

Aromatherapy Pillow Spray

After the expansion of summer, with it’s busyness, activity and action, it seems as natural as breathing that Fall should bring us to a state of looking inward once more.  As I begin to contemplate darker nights and shorter days I naturally seek comfort in routines and familiar rhythms that harmonize our days and nights.

The first shift that I notice, as we transition from our free wheeling summer to a more structured back-to-school rhythm, is the return of our bedtime routine.  As the nights draw in it feels natural to linger a little, take more time over our bedtime rituals and take pleasure in the snuggles and stories that we all crave and love.

I fell in love with essential oils a decade before we began our family, so it has been very natural for me to incorporate them into our hearth and home.  Even when my boys were babies I noticed the benefits a drop of chamomile or lavender could bring, a seemingly tiny alternation that could have profound affects.  Something I began to incorporate into our night time routine some years ago was an aromatherapy pillow spray, also known at our house as a ‘fairy spray’.

Being a lover of the magical wee folk my son was excited to spray his room and pillow each night with a scented mist that let the little people know he wanted them to visit his dreams.  Of course it didn’t hurt that the oil combinations were those designed to help him nod gently off to sleep and, hopefully, stay that way all night.

Aromatherapy Pillow Spray


Though essential oils are no magic bullet for any issue, they certainly can help to support health and well being.  Our olfactory system is the greatest trigger for memory, so a scent can have a profound affect on our emotional state.  I’m sure we’ve all experienced that intense pull back to the past, as a waft of perfume or even a cleaning product triggers vivid recollections of childhood.

My hope is that for my children the scent of chamomile and lavender, orange and frankincense or sweet rose tinted geranium, will conjure cozy nights of warm blankets, loving snuggles and magical tales that weave into their dreams.  A simple spray, a scent that builds up a sense of place over time, can help to support a child in knowing they are truly safe and can rest peacefully.

Different combinations of oils will have different outcomes so choose a recipe that you think will be a good match for your child.  If in doubt, allow them to smell two or three oils and choose the one they prefer, after all it’s their pillow!  Here are a few recipes you might wish to try.

Aromatherapy Pillow Spray

For each of these I use a 100ml (about 3.5 oz) spray bottle and I aim to use about 5-6 drops of essential oil in each mix.  This gives a fragrance without it being pungent or distracting.  As the oils sit in the water the scent will continue to build so you don’t need to worry about adding more oils as you go along.

Relaxation and Sleep Aid

  • Geranium 3 drops
  • Lavender 3 drops

Bad Dream Banisher

  • Lavender 2 drops
  • Chamomile 2 drops
  • Orange 1 drop

Anxiety Support

  • Bergamot 2 drops
  • Lavender 2 drops
  • Geranium 2 drops

Pillow sprays (or magical fairy sprays!) are a great way to introduce the benefits of aromatherapy to your child, bringing a sweet scent to bedtime and gentle support as they rest their heads each night.

If you are looking for more information on the benefits of aromatherapy for your child Aromatherapy for the Healthy Child, is a wonderful resource packed with information and ideas.


SaveSave

10 Books That Inspire Kids to Write (+ writing paper printables)

By Mariah Bruehl,

10 Books That Inspire Kids to Write (+ writing paper printables)

Writing is one of the most important skills for children to learn and feel confident about. Whatever passions, interests, or career paths they may choose, the ability to communicate through the written word will be at the center of all they do.

It is for this reason that our children should have plenty of positive experiences with writing outside of school. It should be a medium that they dabble in, experiment with, try on for size, and utilize as a creative outlet.

I love to use picture books as inspiration for writing activities. As children read they become so involved in the characters and the story that it creates a great entry point for introducing different types of writing.

Here are some of my favorite children’s books to use prompts for writing activities…

  • My Five Senses by Aliki – A great way to encourage children to use descriptive language, incorporating how objects and people in their writing look, smell, feel, sound, and taste.
  • Zoom by Itsvan Banyai – An amazing wordless book that exemplifies that there is always more to things than meets the eye. This book can be used to demonstrate to children that the more descriptive language they use in their writing the more vivid it becomes. Encourage the budding writers in your life to “Zoom-In” on their writing by adding, even the smallest, details.
  • Wallace’s Lists by Barbara Bottner & Gerald Kruglik – A wonderful book that inspires list writing of all kinds. Print out this list paper printable and have it handy after finishing the story. You will be amazed by the lists you see popping up around the house.
  • My Map Book by Sara Fanelli – A lovely book full of creative maps. Making a heart map is a great way to generate lots of ideas for topics to write about. The best writing comes when we write about the things we love most.
  • Wilfred Gordon McDonald Partridge by Mem Fox – A heartwarming book that captures the importance of storytelling from one generation to the next. Encourage your child to collect a box of mementos and use each item as a story-starter.
  • The Boy Who Loved Words by Roni Schotter – Words are powerful, lyrical, and can make magic. The Boy Who Loved Words brings this notion to life for children in a fun and playful way. Make a list of you favorite words and incorporate them into your writing.
  • Nothing Ever Happens on 90th Street by Roni Schotter – Inspires children to remember that every day is filled with small moments that can be captured through writing and transformed into great stories.
  • The Best Story by Eileen Spinelli – A great reminder to children that their writing should come from the heart and be a medium for self-expression.


* This post contains affiliate links.


SaveSave

Patterns in Nature Scavenger Hunt (+ printable)

By Mariah Bruehl,

“Come forth into the light of things, let nature be your teacher.”
– William Wordsworth

As humans, we tend to look for similarities amongst the things in our world.  Perhaps it is a way to help us make sense of such diversity.  Helps us understand how everything is connected and where we fit in.  We love to find patterns, don’t we?  Children are no different.

Playful Learning’s family workshop, Backyard Science Investigations, beautifully explains the stages of engaging with nature that children experience and how important it is for children to be able to make connections between the things in their world.   Patterns are everywhere in nature.  They inspire curiosity and lead to scientific, mathematical and artistic investigations from the very basic to the advanced.  A variety of patterns can be found in the nature right in your own backyard, waiting to be explored.

Finding Patterns in Nature

If you would like to explore nature’s patterns with your child, reading some books together is a great place to start.  Here are some of my favorites:

Once your child has had an introduction to different types of patterns, head outside with this scavenger hunt (see below) and see what you can find.  Note: I have provided two different types of spirals here.  For young children who will just want to explore spirals in general.


You may also like to bring your camera along to capture the specific examples you and your child find.  Your photos can then serve as inspiration for further exploration, art projects, or an entry in a nature journal.

Finding Patterns in Nature

Just be warned, once you start noticing patterns it’s hard to stop!


Making Mandala Art with Kids

By Mariah Bruehl,

Over the last few months I have been exploring creating art with a circle formation or mandala art. Creating mandalas is a delightful, beautiful and easy activity which you can do almost anywhere and at anytime. All you need is a small collection of materials – I prefer natural found objects such as shells, pine cones, driftwood and sea glass. You can use any collection you have be it coins, sticky notes, hair clips, or cutlery!

How to Make Mandala Art

How to make Mandala Art:

  1. Start your circle in an area which will allow your art work to grow, such as a beach, a field, a grassy knoll or a space of floor at home.
  2. Once you have determined your area, gather your materials nearby so you have them in an easily assessable space.
  3. Choose the central piece for your art work and sit this in the center of your working area.  For all of our creations we  tried to select a large item or an item we only had one of to be the central piece, such as a large price of sea sponge or drift wood.
  4. Choose another collection and form a ring around the central piece much like a tree ring.  This may be a circle of shells surrounding the central coral piece, or pine cones surrounding the large flower.  The main focus here is to make sure you make a complete ring around the first piece, therefore the inner piece is completely contained inside the outer circle.
  5. Continue this pattern adding new circles made out of different items until you believe your piece is complete.  A minimum of 5 rings is usually required for visual impact.
  6. Take a photo so that you remember your mandala and you can share it with family and friends through email or Instagram. If sharing on Instagram, you can join many others who create and share their mandala art on Mondays by using the hashtag  #mandalamonday .

How to Make Mandala Art

For little ones who enjoy creating Mandalas here are a few additional things we’ve tried (or would like to try!)…

  • After creating a few Mandalas, we created one using fine liners and water color paints.
  • We read stories from books we had gathered at the library.  The Mandala Book was the first book I shared with my littles before we began creating.
  • There are some adorable coloring in books available such as Everyone’s Mandala Colouring Book , World Mandalas, and the soon to be released Mandala Colouring Book (this one is on my wish list).
  • Create a mandala to be a permanent piece of art and glue to a canvas.
  • Use man-made collections to create mandalas such as toy cars, marbles, or buttons. The possibilities are limited only by your imagination.

Enjoy!


Raising a Boy Who Loves to Write

By Mariah Bruehl,

How to Raise Boys Who Love to Write

Becky from a Sweet Hot Mess is with us today to share invaluable tips for inspiring boys (+girls) to develop a love of writing.

As discussed in my previous post, How to Raise a Boy who Loves to Read, one of our greatest challenges as parents is to create an environment that fosters literacy and a love of learning.  More recently, I have struggled with how to create a love of writing in my children when the whole world around them is so geared towards technology – from their keyboard skills, to apps, to video games.

The first thing I had to do was wrap my head around the idea that reading and especially writing are not fundamental skill sets. Centuries upon centuries of cultures have survived and even thrived with minimal literacy, if any at all.  Once I wrapped my brain around the idea that while language is a skill rendered effective through the immersion process, writing is not.  Writing is a learned skill and how we approach our children as we teach this skill will vary greatly depending on their gender and/or personal temperament.

How to Raise Boys Who Love to Write

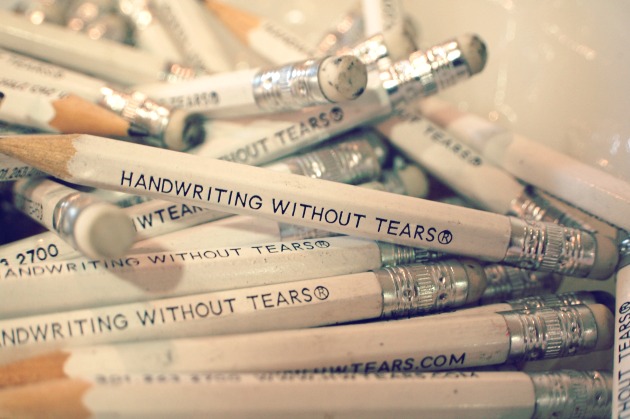
Our boys won’t want to write if writing hurts.  So the first thing you need to consider is the comfort of your son, which means you need to find the right tools.  My basic rule is this – buy what works and don’t stop buying until you find what works.  I first tried every little pencil grip we could get our hands on, from the rubber triangle to the weird ergonomic blob.  This may work for your son but did not work for mine.  So I looked further and finally turned to the idea that there might be better pencils.  We had nominal success with the short pencils from Handwriting Without Tears, the main idea behind them being that they are smaller and easier to handle (I highly recommend these for most children).

How to Raise Boys Who Love to Write

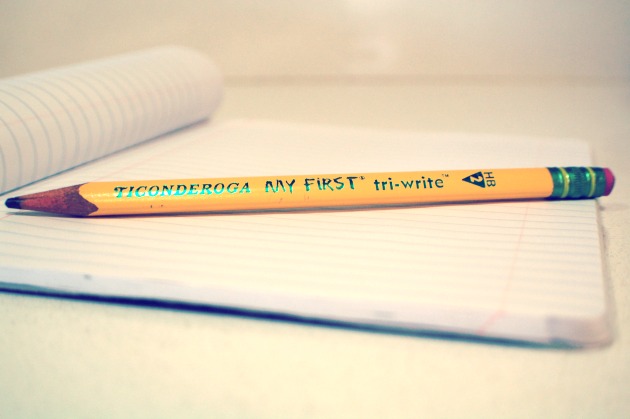
Strangely enough, our next choice was the opposite of the small pencils and when I found the long, chubby triangle grip of the Ticonderoga pencils (found HERE on Amazon),  we had instant success.  They’re huge, but don’t hurt.

How to Raise Boys Who Love to Write

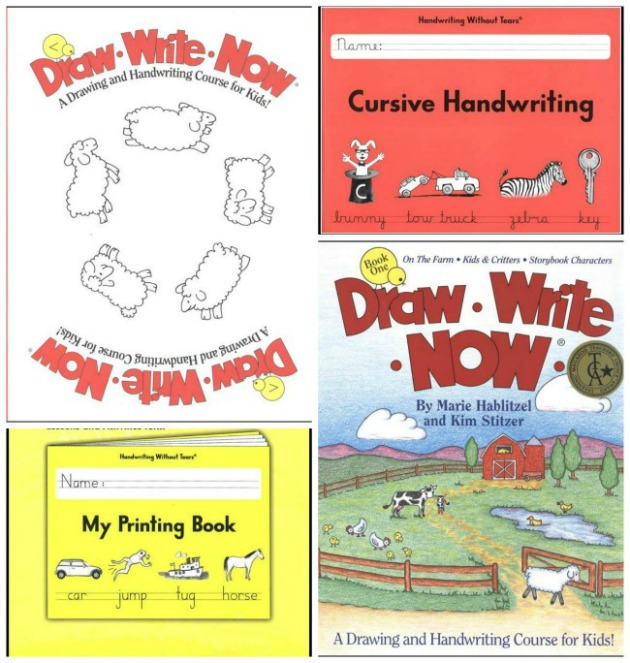
Our second was to try to find writing aids or programs that would interest him.  Fair warning, these aids only worked for so long and then my son quickly got bored.  But they are a good jumping off point.  I would highly recommend Handwriting Without Tears for the basics.  And for a little bit of change of pace, I would also recommend Draw Write Now, which allows for the kids to practice basic drawing and writing skills.  We even just use the workbooks without the themed instruction books and let the kids choose their own stories to write and what pictures they will draw to go with them.

How to Raise Boys Who Love to Write

So now that your son is comfortable holding a pencil, has mastered the basics of handwriting and has good line control – what next?  HE WILL GET BORED.  This is where you have to get creative as a parent.  Here are some of the ideas that we have used that help my son write more freely without getting overwhelmed with the chore of it all:

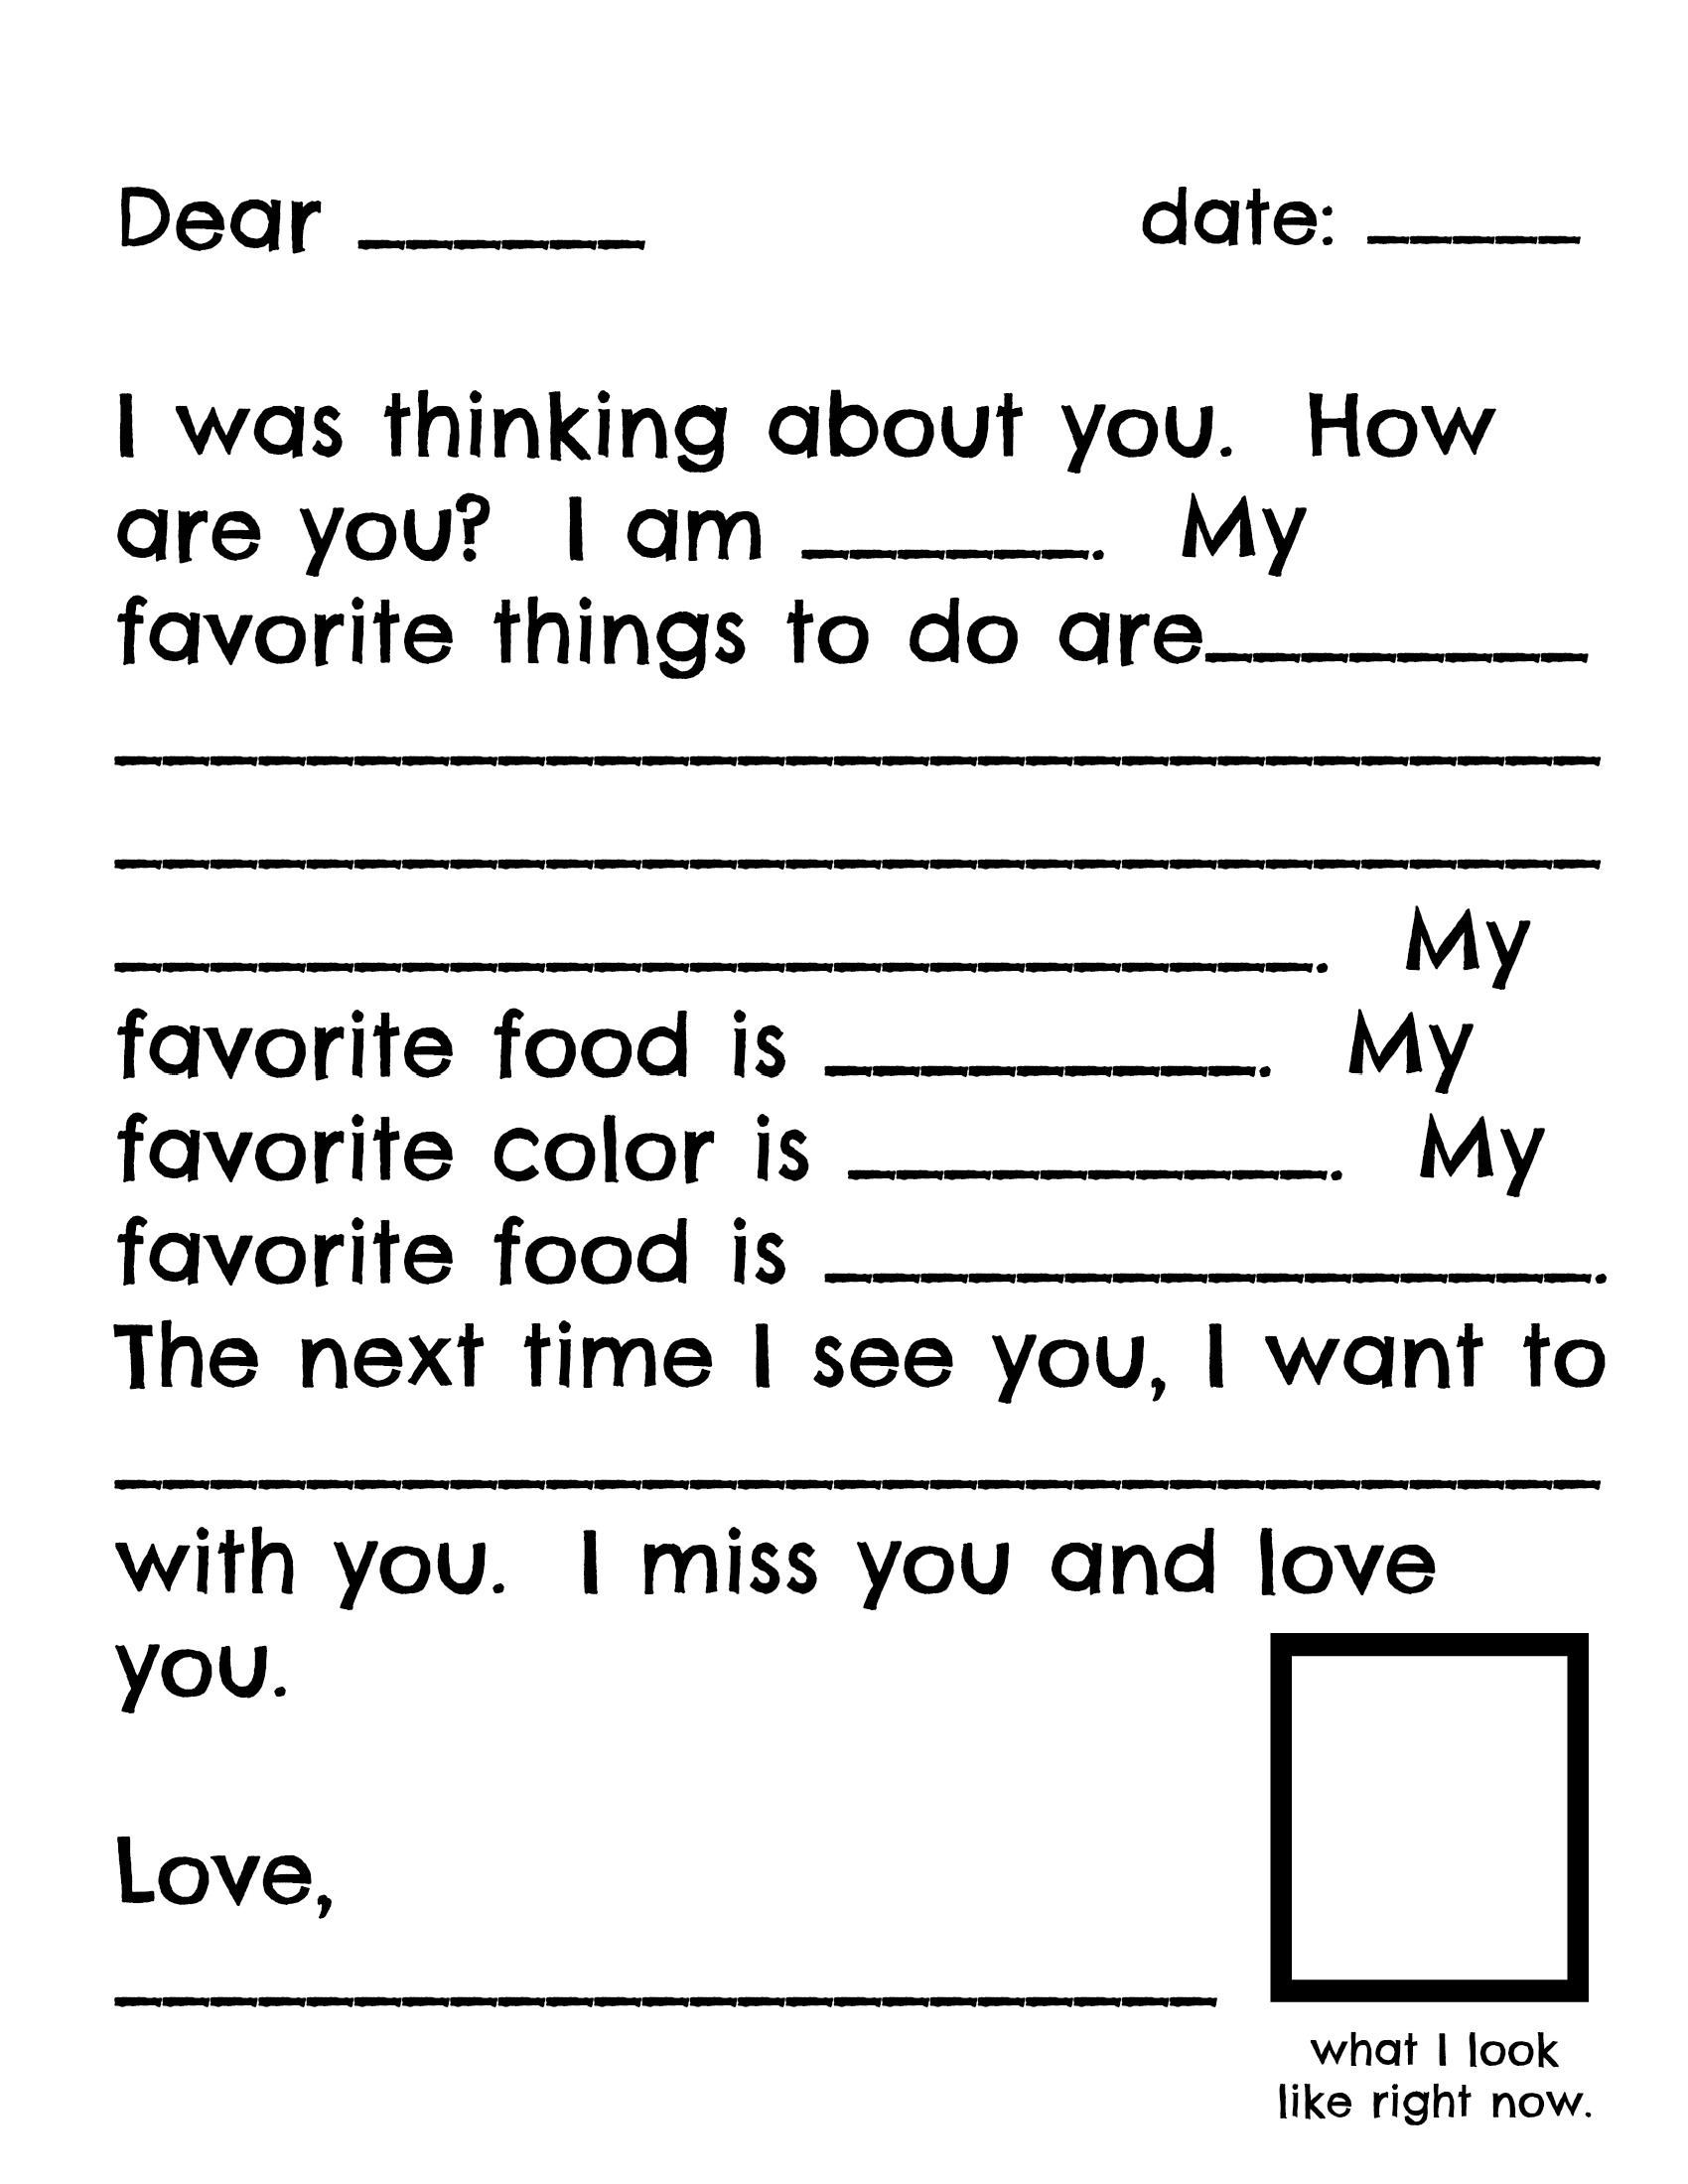
  • Create a Letter Writing Station.  I borrowed this idea from Randi over at Swoon (click HERE to see the original post on Playful Learning) and it has been a great success in our home.  My son likes to sit down and write notes to his grandparents, cousins and friends.  Sometimes he emails them, sometimes he sends them snail mail.  I recently added Thank You notes, so that as soon as he needed to, Luke could go to his kit and write a quick thank you to his friends and family.  To help streamline this process in the beginning, I created a form letter that lets the kids fill in the blanks as they go and does not overwhelm them with the idea of creating the format from scratch.

How to Raise Boys Who Love to Write

  • We also like to create Family Newspapers, Movie Posters and screenplays.  My kids are very interested in the behind the scenes efforts of filmmakers and my son loves to sit down and start writing his own scenes.  He will follow this up by creating the poster and the taglines for the film he dreams about in his head.  Family Newspapers are fun as they allow the kids to journal a bit more and to draw lots of pictures and captions to go along with the short paragraphs.

  • Allot a certain amount of computer time and even start a blog for your son (or daughter).  My son loves to write long, complicated stories with many small chapters.  I let him type them out and print them, illustrating them at will.  When he blogs, I allow him to upload his favorite pictures and write his descriptions – which basically turns into a great journal we can print for him someday.  This step is important.  Not only are most state’s standards focusing less on handwriting and more on keyboard skills, this also allows our sons to type and forgo the uncomfortable and sometimes anxiety producing process of handwriting.  With a keyboard, they will be more apt to focus on the story, spelling and sentence structure and less on whether their hand hurts or how many eraser crumbs are crowding the page in front of them.

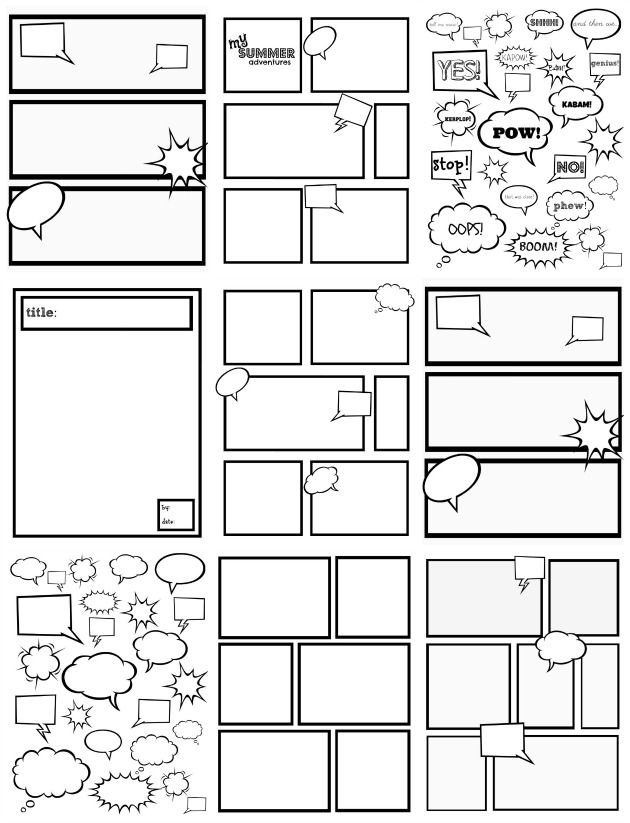
  • Last, but not the least, I created comic books strips for my son after I realized he adored Calvin and Hobbes.  Sometimes I will just give him a stack of templates and let him figure it out on his own and other times I will direct more and ask him to draw our road trip or a scene from his favorite movie or book.  And since I take away all of our normal rules of grammar and capitalization, these little comic books can become a liberating space to create and grow our children’s imaginations.  And if your child needs a little extra inspiration to get used to the format, get them a paper and let them read the comic strips and see what strikes their fancy – imitation can be the highest form of flattery.

My comic strip templates are the most popular download on my blog…and because Playful Learning is such a wonderful resource for so many passionate and wonderful parents, I designed a few more templates just for you.  I even added a few extra add-on pages, which are great for the kids to color and cut out and glue on for themselves.  Click on the photo below to download and print comic strips and letter forms of your own!

How to Raise Boys Who Love to Write

Learning to succinctly articulate one’s thoughts and arguments is one of the greatest skills we can develop in this life.  To do so in writing and to love to do so – is an even greater skill set.  As parents, our goal is to create an environment rich with opportunity and variety.  Consider sometimes stepping back and releasing the anxiety of this task – for you and for your child – as you learn to focus on the love of the story and less on the skills of holding a pen to paper.  And for the more serious moments, where learning has to be done, just make sure you sprinkle enough variety and fun into your routine, and writing will soon become a one of your child’s favorite pastimes.

How to Raise Boys Who Love to Write

The best part of my week are those quiet afternoons when I am walking down the hall and glimpse into my son’s room and notice he is immersed in a journal, his pictures and words and imagination covering the pages.  I try to walk on unnoticed, to allow the moment to continue, a deep sigh of relief escapes me as I know my love of the written language has been handed down, the baton has been passed on and is now grasped tightly in my son’s now adept hands.  I hope you have many of those moments yourself.


Making Math Fun: The Nifty Nines Trick

By Mariah Bruehl,

The Nifty Nines Trick

Annie from Alphabet Glue is with us to share a fun and easy trick for mastering those hard to memorize nines timetables…

Back in my days as an elementary school teacher, this was one of my favorite math tricks with which to wow the kiddos. It still kind of is. And it isn’t just a party trick; there is some actual math involved here, and for a kid needing to multiply a number by nine and feeling a little bit stuck, it can be a real confidence booster.

Here’s how it works:

Hold up both hands in front of you with your palms facing away, and pick an equation to solve that involves multiplying by nine. For example, 9 x 4. Starting from the pinky on your left hand, count up to the number that you are multiplying by (in this case, 4). Fold down the finger for the number you are multiplying by nine. Now look at your hands again. The fingers to the left of the finger that is folded down represent the tens place. The fingers to the right represent the ones. So, when multiplying 9 times 4, and folding down the fourth finger from the left, you will end up with three fingers to the left, and six to the right. The answer is 36.

The Nifty Nines Trick

Try this trick with any single digit number that you want to multiply by nine. Works like a charm every time!

Note about the photo: photos are a mirror image, so when you look at the picture, try to remember that the tens number will be equivalent to the fingers on your left in real life!


Crafts for Kids: Kite Paper Stars

By Mariah Bruehl,

Kite paper stars are a fun way to brighten up your window any time of year.   Commonly made in waldorf schools, this is an excellent activity that children can do to practice hand eye coordination.  The star I am showing you how to make today is a very basic star to start with.  This project can also be done with regular tissue paper, however, the kite paper is far easier for little ones to work with.  For ages 6+.

Crafts for Kids: Kite Paper Stars

Supply List:

(to make four 8.75″ stars)

1 sheet of 6″ square kite paper in 8 rainbow shades (you can also find it here)

tombow glue (or any liquid glue that dries clear)

paper cutter (or scissors)

Crafts for Kids: Kite Paper Stars

1.  trim each 6″ sheet in half both ways to create four 3″ squares.

Crafts for Kids: Kite Paper Stars Crafts for Kids: Kite Paper Stars

2.  Fold each square in half to make a triangle.  then fold in the sides to the center line to form a diamond shape.

Crafts for Kids: Kite Paper Stars

To Assemble the Star:

3.  On the “front” of the diamond, put a teeny tiny dab (using a toothpick works well) on the spots shown above.

Crafts for Kids: Kite Paper Stars

4.  Attach the next color in the rainbow to the two points as shown in the photograph.

Crafts for Kids: Kite Paper Stars

5. Continue gluing on the points until you come to the last one.

Crafts for Kids: Kite Paper Stars

6. Tuck the last color under the first color so that it overlaps, and glue as you have done for the other points.

7.  Add another dot of glue on each flap so that it lays flat.

Crafts for Kids: Kite Paper Stars

Stars can be hung from a strand of fishing line or…

Crafts for Kids: Kite Paper Stars

…attach them to your window using a tiny piece of tape behind one of the dark colors so it is less noticeable when the sun shines through!

Experiment with other color combinations or make “snowflakes” using white kite paper!

More patterns can be found in the following books:

Magical Window Stars

 The Christmas Craft Book

The Children’s Year

All Year Round

Crafts Through the Year


SaveSave