Category: All posts


Math Stories

By Mariah Bruehl,

Playful Learning: Math Stories

When I was in elementary school, my Dad would often help me with my homework. He had a great way of incorporating stories into the work, and I always looked forward to that time with him. Children love stories and story telling and I’ve found that it’s easy for them to learn new things while lost inside a tale. With this thought in mind, we’ve started a new game around here that focuses on simple addition and subtraction. It started with a homework assignment, and has grown into something more…


Math Stories


All you need to play the game is a group of objects, preferably of the same nature. You can use a favorite set of toys or even dried beans.  We used a set of unfinished peg dolls for this post, but have also used ponies and paper dolls. The concept is simple, set up an invitation to play with your objects and perhaps and few little props. Take turns telling a story using your objects and props, inserting a few key questions about the amount of objects along the way. My children tend to like it when I tell the story and they do the counting and act it out with the objects.


Math Stories


For example, a story may go something like this…A group of people were spending an afternoon playing at the park. How many people were in the group? One Mom and her two children decided to go home for lunch.  Now how many people are left at the park? The stories can be as simple or complex as you’d like. My children really love counting and answering the questions. My oldest, six, is able to do the simple addition and subtraction easily, so I try to make the story a bit more complicated so she feels challenged. She also likes to make up stories herself. My four year old is fairly new to these concepts and loves counting the objects out each time to answer the questions. The objects serve as a great visual, concrete representation of mathematical concepts and the story makes things fun! Math Stories

Prop Boxes: Creating Imaginative Play Spaces

By Mariah Bruehl,

Prop Boxes: Creating Imaginative Play Spaces

Joey from Made by Joey is with us today to share a dose of inspiration for nurturing dramatic play with the children in our lives…

What are prop boxes?

Prop boxes are used by many preschool and Kindergarten teachers to create imaginative play and hands-on-learning opportunities in their classrooms.  They are essentially a collection of items (or props) that suggest a specific theme and “set the stage” for a child’s imagination to engage in creative play.

How to make a prop box for your home.

Prop boxes can be coordinated for a variety of age groups.  First of all decide on your “theme”, some examples might be:  a doctor’s office, supermarket, traveling to India, deep sea diving, restaurant, dentist, health club, spaceship, pet store, hardware store, library, museum, pirate ship, shoe store or fire station.

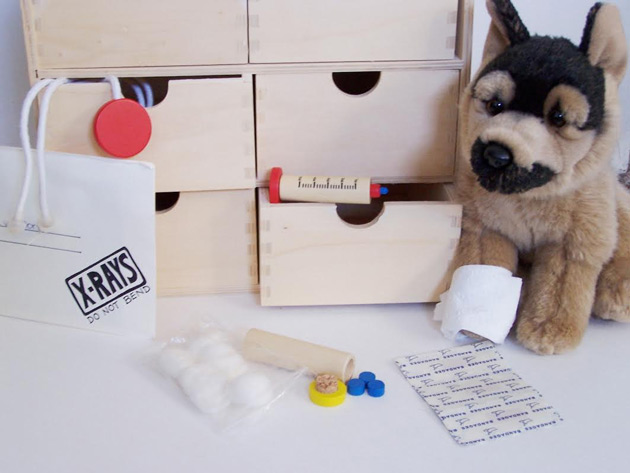
Make a list of items that are used in the location you choose.   Think of the small details that help define the space.  Some examples for a doctor’s office might be:

– a telephone

– an appointment book and pencil

– a clock

– chairs for the waiting room

– magazines for the waiting room

– money or medical cards (make copies of your own)

– receipt book

– a white shirt for the doctor to wear

– a nurse hat

– medical bag with a red cross

– patients (dolls, stuffed toys)

– a stethoscope

– an eye chart

– fabric for slings

– cotton balls and swabs

– x-rays (b&w images printed on clear transparencies work well!)

– plastic medicine syringes

– plastic medicine measuring cups

– empty medicine bottles (washed)

– small paper water cups

– a “prescription” pad and pencil

– assorted sizes of bandages

– gauze (toilet paper works too!)

– scissors

– thermometer

– tongue depressor (if your child is old enough to handle one)

– magnifying glass

– tweezers

– examining bed

– small blankets or fabric to cover patients

– bathroom scale

– tape measure for measuring height

Presenting the above items should instantly spark imaginative play.  Let the child set up the space while you watch from the sidelines.  Depending on your child’s age, more learning opportunities will soon present themselves, such as:

– making signs for the reception area, waiting room and examining room

– making name tags (Dr. _____,  _____ RN)

– tying slings

– applying bandages

– writing in the time of the appointment using the clock

– writing prescriptions for patients

– paying and writing receipts

– reading a thermometer, scale or tape measure

– answering the telephone

Prop Boxes: Creating Imaginative Play Spaces

Watch where the play takes them.

Perhaps the play eventually moves from the doctor’s office to the patient`s home where they now receive homecare, get well soon cards and flowers from their friends.  Or maybe the doctor has just announced that the patient is going to have a baby and they need to start preparing for the arrival of a new family member!

Try to include all of the senses.

To enhance the experience of a medical office even more you may:

– play music appropriate to your theme (waiting room music?!)

– at lunchtime cut the child’s sandwich with a gingerbread man shaped cookie cutter.

– introduce scents to the play (flowers brought to the sick patients)

Be ready to answer questions.

Imaginative play can often lead to the beginning of some great conversations with your child.  A doctor`s office may bring up questions about their own bodies so a book on Body Science may be a good reference to have on hand!  Or if you have had someone close to you receive bad news from a doctor recently, this may be the perfect opportunity to check in with your child about their feelings and answer any questions.

More tips about collecting supplies.

You will likely find that many of the items on your list you already have in your home in one form or another, but a few other places to look for specific supplies are Thrift Stores, yard sales or online stores.  Visit the library or bookstore ahead of time to find story and reference books about the theme you are planning to set up.

Books on Prop Boxes…

These are a few of my personal favorites!

I hope these ideas spark an afternoon of fun for you and your child!

SaveSave

Starting a Communal Loom

By Mariah Bruehl,

Starting a Communal Loom
Rebecca from Thirteen Red Shoes is with us today to share a wonderful community building, art making activity—starting a communal loom.


Recently I have become interested in weaving. I have been inspired by the amazing Maryanne Moodie, who is an Australian artist now based in New York.

While Maryanne was still in Australia, I had the opportunity to work with her and was inspired by her communal loom, which was set up in a florist shop in Melbourne. See images here, here, and here. Isn’t it the most beautiful form of building a community that you can ever imagine? I just want them to pop up everywhere.


Starting a Communal Loom

I decided to set about creating a communal loom for my home and my school. I am so pleased to be able to share with you the completed loom and the beginning stages of creativity, at the all girls school in which I work.


Starting a Communal Loom

The loom was created very easily by using the frame of an old painting easel as our base.


Nails were added across the top and the bottom of the frame 10mm apart. Onto the nails I was able to string up my loom, or the warp, and voila! the loom ready for weaving was born.


The easel makes it portable and easy to set up in the garden, classroom, or even to take home.


I have introduced the girls to the basic tabby stitch and have added a few rya stitches in just for me. The loom is set up on both sides and we use it in the gardens at school, where all are welcome to weave.

Starting a Communal Loom

The loom welcomes children before school on the front veranda and pops up throughout the day in the garden, library, or even classrooms. It is a communal activity that I have encouraged the girls to bring family members along to, as well as their own yarn. I can not wait to see the final product. We are, however, focusing on the process, rather that what we will do with the final piece.


Here are some You Tube links to a few stitches that will get you started…

For the Kids: Crafting Thank You Notes

By Mariah Bruehl,

For The Kids: Crafting Thank You Notes

As a child, I can remember my Nana telling my sister and I that thank-you notes were an obligation and practically hovering over us as we begrudgingly completed this undesirable chore.  I’m sure we robotically scribbled out something along the lines of “Thank you for the (description of gift here).  We really appreciate it.”.  It can be hard for children to understand the importance of a thank-you note and how to make it meaningful and sincere.  It wasn’t until I received a heart-felt thank you note myself that I realized what an impact they can have and the true purpose for giving them.

As parents it is important to not only teach and model a sense of gratitude for our children but to make it a regular practice.  Identifying that which we are thankful for and knowing what it is to feel thankful provides the basis for expressing thanks to others for their gifts or kind gestures.  So what does a meaningful thank-you note include and how do we help our children find the words to express the specialness of the gift?

Let’s start with the basics.  All thank-you notes should include:

  • a greeting
  • an expression of thanks
  • mention of the specific gift
  • a closing with your signature

Meaningful and memorable thank-you notes include:

  • mention of feelings that the gift elicited
  • an explanation of why it was special
  • a statement of how the gift will be used or is being enjoyed
  • a compliment or acknowledgement of the giver’s thoughtfulness

For The Kids: Crafting Thank You Notes

Of course, the depth of what the note includes will depend on your child’s age.  A drawing depicting the gift by a young child would certainly be appropriate.  Pre-writers and beginning writers can dictate what they would like written.

Here are some tips for guiding children in writing thank you notes:

  • Make it fun!  Set up an invitation with papers, note cards, markers, pens, paints, stamps, envelopes, postage, and an address book.  Add interesting embellishments like photos, decorative tapes and stickers.  Here are some creative ideas.
  • For ages 10 and up, try including this book with the supplies: The Thank You Book for Kids, by Ali Spizman.  It was written by a 14 year-old and provides inspiration for creative ways to say thank you.
  • Sit down with them to write some of your own.  Make it a family time.  You’ll be modeling the behavior and will be available for guidance and encouragement.
  • Ask questions about why they like the gift and what they like to do with it, what is unique about it and what are some of the special qualities.  This will help them identify thoughtful sentiments to include in the note.
  • Let children express themselves in their own voice.

I hope this helps set your young ones on a lifetime appreciation for the art of crafting meaningful thank-you notes.  Have a wonderful holiday season and a very joyous New Year.  Remember, a thankful heart is a happy heart!

Making a Winter Solstice Tree

By Mariah Bruehl,

­­Making a Winter Solstice Tree

Today Emma from 95 Acres of Sky is with us to share a lovely way to welcome in winter and celebrate the solstice…

This week we will mark the winter solstice (Dec 21/22), which marks the beginning of deep winter and tells us that the time has come to turn inwards and rest.  Just as the sun begins his rebirth, so to do we, renewing ourselves each winter to be born again into the world in the spring.

This is one of my favorite festivals, whether shared with friends or with my own family alone, it is a time to recognize the cycle of the seasons and the role they play in our lives.  This year I wanted to include in our celebrations the wild creatures that we share our land with. I was inspired by reading the lovely book, The Night Tree in which a family go into the woods to decorate a tree with treats for the animals that live there.

We are fortunate that we don’t have to go far to find a tree to decorate, but even if you live in a town, you could hang decorations at a nearby park, on a bush or set out a dish on your windowsill,  the birds and squirrels will certainly thank you for it.


Making a Winter Solstice Tree


The way in which you decorate your tree is entirely up to you, there are lots of lovely choices.  You can use purchased bird treats but I think the process of making the treats makes the offerings more personal and meaningful.  Here are a few simple-to-make snacks that will be welcomed by your wild friends:

  • Popcorn strings.  Use plain popcorn for this rather than one with a coating, we make ours in a pan from popcorn kernels, it’s very fun!  Using a thick darning needle and some wool or embroidery thread string the kernels into a long garland, string around your tree for a festive feel.  See a lovely version here.
  • Natural bird feeders, these can be made with all sorts of things, apple rings, carrots or even pine cones coated in peanut butter and bird seeds.  There is a lovely tutorial here.
  • Suet feeders are the perfect food for foraging birds, it’s important to remember the birds are omnivores so, like us, they need fat to keep them warm and well in the cold months.  Vegetarians can make their feeders out of coconut oil!  Here are some great links for bird treat recipes here.
  • As well as leaving treats out for our feathered friends, it is lovely to scatter a few on the ground for those without wings.  Pieces of carrot, nuts and berries will be a welcome addition to creatures heading into hibernation and, in my experience, nothing will bring the deer coming to call quite like pieces of pumpkin!


Making a Winter Solstice Tree


So this solstice get outside and enjoy the wonders of the year’s shortest day and share the blessings of your larder with your wild neighbors.  Happy Solstice and a Happy Yuletide!


Holiday Yoga: Journey to the Moon

By Mariah Bruehl,

Holiday Yoga: A Journey to the Moon

Monique of Green Acorns is with us today to share a lovely yoga routine that is perfectly suited for season…

This time of year can be a flurry of activities and preparations for many.  While it may be enjoyable, it is added activity to an often already full schedule and can be a cause of stress.  Our children can feel it too whether they are reacting to the stress of the adults around them or are experiencing their own.  Perhaps they are getting less sleep due to excitement or later bedtimes to accommodate special events.  Perhaps they are getting less time to play freely.  In parts of the world that now have shortened daylight hours and cold weather, children often have less time outdoors and, as a result, less physical activity.

Holiday Yoga: A Journey to the Moon

Yoga is a wonderful way for children to expend some restless energy and exercise their bodies.  It will also focus their energy and minds and bring a sense of calm and peace.

This month, I thought it would be fun to offer a Yoga sequence in which children really get to use their imaginations to transport themselves to another world… To take a journey to the moon.

Journey To The Moon Page 1
Journey To The Moon Page 2

If you would like to read a book first to help spark their imaginations or provide some imagery, here are a few recommendations:

Enjoy the voyage and have a very joyous holiday season!

Designing Spaces for Children: Light

By Mariah Bruehl,

Designing Spaces for Children: Light

There’s nothing quite like the warmth of natural light as it peeks through a window. The way it illuminates the surrounding area, marks the passage of time, and connects you to the natural world. Light is essential to all life and an important design element when creating spaces for children.

Designing Spaces for Children: Light


Have you ever noticed the way children explore shadows? The way they experiment with size, shape, angles, perspective…?


Designing Spaces for Children: Light


Light shapes our perception of things and its qualities are fascinating. Watching light as it moves, sparkles, and refracts, forming colors and shadows, naturally captures children’s interest and can act as inspiration.


Designing Spaces for Children: Light


So, in what ways can light be used when creating spaces for children?


Having a variety of light sources – natural light, overhead lighting, and table lamps  – are a great place to start.  Light tables, overhead projectors, and flashlights are also wonderful tools for exploring light.  If you have windows in your space, are they free from clutter?  Is light able to pass through?


Including materials like prisms, mirrors, and translucent objects such as colored cellophane, paddles, and flat marbles capture light and can support many types of curriculum.  Are you studying animal habitats?  How about creating a play scene using small animals with flat marbles and stones on a light table?


Designing Spaces for Children: Light

Penumbra, Jean Shin, broken umbrellas and thread, 2003

 Inspiration is all around us. This art installation was created by Jean Shin, an artist based in New York City who stitched together fabric from broken umbrellas.

Designing Spaces for Children: Light

Penumbra, Jean Shin, broken umbrellas and thread, 2003


Notice how light moves through the material and creates shadows on the ground.

Designing Spaces for Children: Light

Penumbra, Jean Shin, broken umbrellas and thread, 2003


How do you use light in your space with children?  Where do you find inspiration?

Sign-Up Now!

For more inspiration on creating spaces for children, check out our Playful Learning Spaces Workshop.

Start: November 4, 2014

End: November 21, 2014

To register, click here.

Moon Spotting

By Mariah Bruehl,

Moon Spotting With Kids

Monique of Green Acorns is with us today to share some great tips and for moon watching with the budding young scientists in our lives…

The time of year when the amount of daylight is lessening and it is dark outside at a fairly early hour is the perfect time for children to observe the moon.  Many children are fascinated by our solar system, especially by the celestial bodies that they can see.  The changing phases of the moon is such an intriguing natural phenomenon and one that young children don’t often get to investigate.

Nurture their sense of wonder by bundling up, heading outside into the darkness, and doing a little moon spotting together. Here are a few tools that may help you get started…

Moon Spotting with Kids

1. The Moon Book by Gail Gibbons

2. Walk When the Moon is Full by Frances Hamerstrom

3. When the Moon is Full by Mary Azarian

4.& 5.  Use the printable moon journal to record your child’s observations and to spark even further investigation.

  • journal cover (print both pages back to back on the same sheet)
  • journal pages (When printing, choose “multiple” with 2 pages per sheet.  Print on both front and back sides of your paper.)

6. You can find a helpful diagram of moon phases here and check moon rise and moon set times as well as a moon phase calendar for your area at The Old Farmer’s Almanac for Kids website.

Happy moon spotting!

P.S. Moon spotting can also be a wonderful family activity during this time of year when many of us tend to get overloaded and overwhelmed with holiday preparations and increased events.  Taking the time to slow down and be mindful of our environment helps center us.  Gazing at the vast space above can help give us perspective of what’s truly meaningful in our lives.  What a lovely ritual for ending each day!


Picture Book Advent Calendar

By Mariah Bruehl,

Picture Book Advent Calendar

Rebecca from Thirteen Red Shoes is with us today to share some lovely tips for sharing a picture book advent with your family this holiday season.

We have a family tradition: each day of advent the little ones get a picture book.  It is the only advent calendar we have in our home, so no little lolly delights or small toys, simply a new picture book to open.  I know that this is extravagant, but it is where we choose to spend our money.  I am such a huge believer and lover of children’s literature, that I budget this in every year. Instead of buying them all at once, I buy the books gradually throughout the year.

The books are wrapped and gathered on the mantle in our lounge room. Each night of December, once the littles are bathed and in their pajamas, we select a new book to unwrap and gather on the lounge to share. In the past, my book collection has included fiction, non-fiction, picture books, chapter books, as well as a few audio books.  The variety makes it even more exciting.

If you are like me and you store Christmas books away from January to November, you can wrap them up and add few newly acquired titles to create your own book themed advent calendar.  Picture Book Advent Calendar

There are so many delightful titles on the market!

Here is my most recent list of our favorite holiday books.

And for added inspiration, here are a few of our favorite authors:

Here a some other delightful ideas for advent:

Our Gratitude Tree

By Mariah Bruehl,

Our Gratitude Tree

“Gratitude unlocks the fullness of life. It turns what we have into enough, and more. It turns denial into acceptance, chaos to order, confusion to clarity. It can a meal into a feast, a house into a home, a stranger into a friend.” -Melody Beattie


With family gatherings to plan and Christmas lists looming, it’s easy to let the meaning of Thanksgiving get lost or watered down. Ideally we would live in a constant state of gratitude, but I like the subtle reminder that Thanksgiving brings us each year. An excuse to stop and take pause-be thankful for all things, both big and small. I especially think it’s wonderful to teach this to our children in a world obsessed with having more. Last year we took an afternoon and composed a gratitude list, it was both endearing and eye-opening to see the things my children thought of. This year we decided to expand on that idea and take a moment each day to add at least one thing to a month-long gratitude list in the form of a gratitude tree.

Our Gratitude Tree

When a quiet moment arises each day, my girls and I sit by the fire, write down something we’re thankful for, and then attach it to our tree. I love the idea of something tangible and beautiful to represent these thoughts we are focusing on this month. We decided to make fuzzy pom-poms from yarn and hang them from our tree with the pieces of our growing list attached to each one.

Our Gratitude Tree

All you need to make a tree of your own is a few gathered branches, a vessel to hold them, and some slips of paper. Adding an extra object like our pom-poms into the mix isn’t necessary, but adds to the fun! You could choose anything you want, from acorns to leaves. You could also choose to cut your paper into fun shapes instead, like stars or feathers.

Our Gratitude Tree

To make things easy, we used full sheet label paper to make our strips. Simply fold each strip in half, write your thought, pull the backing off and attach to your pom-pom or other object. The most important thing is to make things fun and accessible for the little ones. My girls love seeing all of the pom-poms on display and enjoy taking turns picking out the one we will use. Our strips, scissors, and pen are stored in a jar right next to the tree.

Whatever you choose to do, I hope you are able to pause for a moment with the ones you love and reflect on all that you are grateful for this month. It’s not too late to create a special moment with your little ones!