Category: All posts


Picture Book Projects: Extra Yarn

By Mariah Bruehl,

Picture Book Project: Extra Yarn

Randi from Swoon is with us today to share a fun project to compliment the inspiring book, Extra Yarn by Mac Barnett.

Being displaced and living with family this summer has made doing activities with my children especially difficult. This week they reminded me that the best projects don’t have to require a lot of skill, time, or materials and preparations.

While reading one of our favorite picture books, Extra Yarn by Mac Barnett, my daughters expressed an interest in making something with yarn. They love this story of a young girl with a generous heart who fills her village with color. If you haven’t read this book, look for it on your next trip to the library. You’re in for a real treat!

Picture Book Project: Extra Yarn

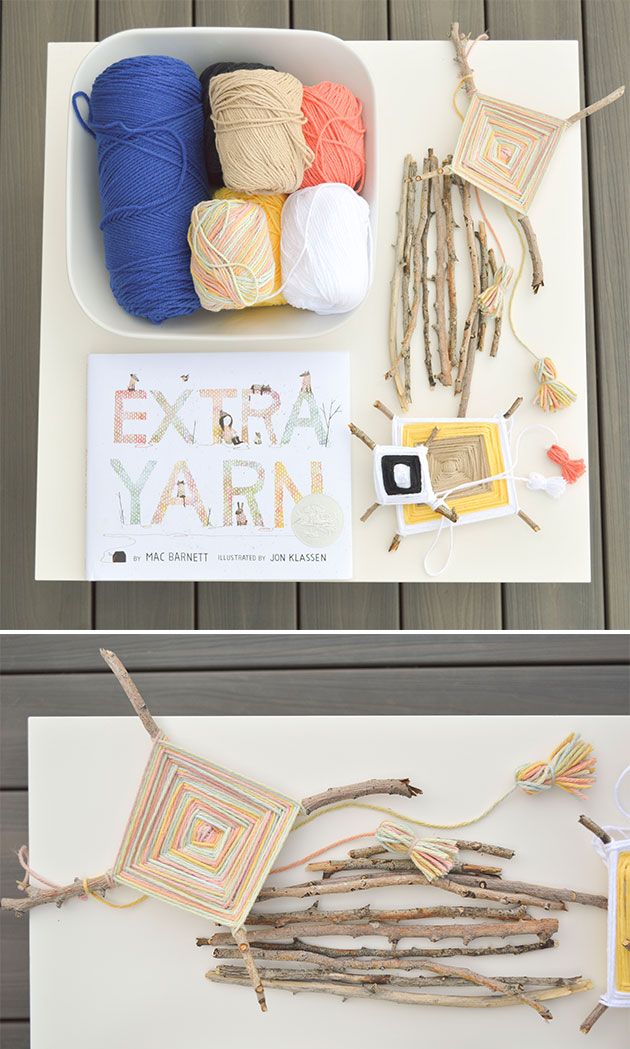
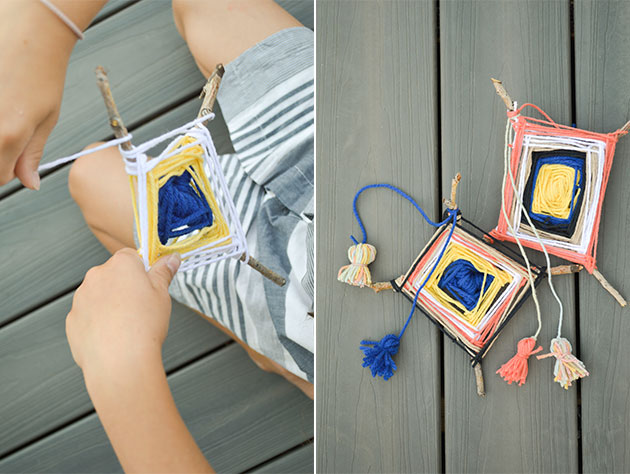
We chose to make God’s Eyes as a simple introduction to working with yarn. We gathered up some sturdy sticks, a pair of scissors, and some yarn. We were also able to invite a friend over to share in the fun, which was a lot of fun!

Picture Book Project: Extra Yarn

Picture Book Project: Extra Yarn

Want to make a few of your own? Start with two sticks, roughly the same size.

Picture Book Project: Extra Yarn

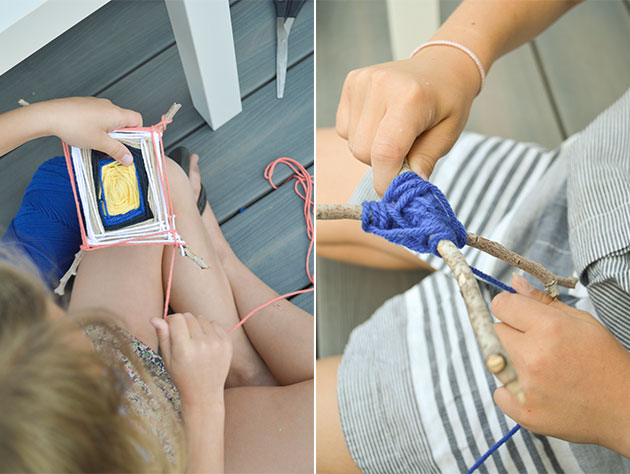
1. Lay two sticks across one another, forming a cross. Take the end of a piece of yarn (approx. two feet long) and tie it around the middle, fastening the sticks together. Wrap yarn diagonally  across the middle of the sticks a few times in each direction to secure. Do this until you cover the middle completely. Don’t clip the end, as this will become your working string.

Picture Book Project: Extra Yarn

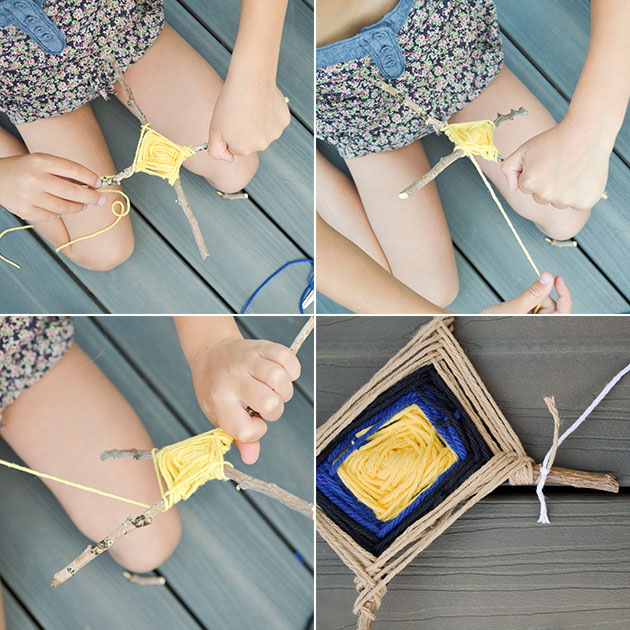
2. Working counter-clockwise, wrap the end of yarn over a single stick. As you pull the yarn up and around, bring it directly over the top of the next stick, pulling tightly and turning cross as you go. Continue around and around until you have about two inches left of yarn.

3. Attach another color by tying a new piece of string to the working string and trimming the ends. Continue working your way around.

When you’ve added all the colors and rows you want, it’s time to finish. If you have glue, you can glue the end of your yarn to the back of your design. Or, you can tie it to the strings in the back, like we did. We also added some fun tassels to ours after they were done, as well as tying on a small loop of yarn for hanging.

I hope this week you are able to get down on the floor with your kids and do something creative, perhaps inspired by a favorite book, or just your wild imaginations!

Flip 10! A fun math game…

By Mariah Bruehl,


title69

Joey from Made by Joey is with us today to share a fun game to play with our developing mathematicians.


This is a simple card game for early learners to help them learn the combinations of numbers that when added, equal 10.

This game can be played with 2 or 3 players.

Here are the rules:

Flip 10!

1) Remove all of the 10’s, J’s, Q’s, and K’s from a deck of cards. This will leave you with 36 cards from A (which we use as the 1 card) to 9.

Flip 10!

2) Lay 18 of the cards face down.

Flip 10!

3) Deal the remaining cards to the players. 2 players – deal 9 cards each, 3 players – deal 6 cards each. Sorry, the game does not work with 4 or more players.

Flip 10!

4) To start the game the first player flips over one of the overturned cards. Let’s use a 7 as an example…if the player has a 3 in their hand then they may put it down next to the 7 to complete their turn. If the player does not have a 3 then they cannot make a move and their turn is done. When a player does not play a card, the next player now has an additional opportunity to play a card if they have it in their hand.

Flip 10!

5) The second player then turns over another card. If they have the number that would make the total ten then they may play their card to complete their turn.

Flip 10!

6) If during the game two single cards have been overturned and they add up to ten (in this case 6 and 4), then a player can move one of the cards over and place down one card from their hand into the empty spot(in this case an A).

If the player is really thinking and has two cards in their hand that add up to ten, then they will play both those cards (A and 9) and play 3 cards in one turn!

Flip 10!

7) The first person to put down all of their cards is the winner of the game, however, everyone is a winner when they learn these valuable number combinations!


Enjoy!


Skin Care for Pre-Teens: Raising Natural + Confident Girls

By Mariah Bruehl,

Skin Care for Pre-Teens: Raising Natural + Confident Girls

Monique of Green Acorns is with us today with to share some inspiring natural skin care recipes for the growing girls in our lives.

As our children grow and enter different stages of development, we as parents are provided many amazing opportunities to teach, guide, and nurture them.  Every age brings unique joys and challenges and at every age playful learning experiences can continue to promote a sense of wonder, deeper exploration, and connectedness.  They can also be a support for our growing children as they enter a stage that is often confusing and exciting for everyone – adolescence.

One topic at the forefront for adolescents is their changing skin.  They can often feel unsure and embarrassed.  Helping them learn about proper skin care will support not only a healthy lifestyle but a healthy self-image and sense of confidence.

It is important for pre-teens to develop good skin care habits that include cleansing once or twice a day, keeping hands off to minimize irritation and the spread of bacteria, healthy nutrition, and proper hydration.  To keep skin balanced, moisturizing and exfoliation are also beneficial.  Most importantly, perhaps, is to be gentle!  Use gentle products and have a light touch to avoid damage to the skin.

Skin Care for Pre-Teens: Raising Natural + Confident Girls

As my daughter enters her adolescent years and notices her skin going through changes, we have been learning more about skin care together.  We prefer to use as natural products as we can and often start with the simplest – those which come right from nature or have very few ingredients.  Some of our favorites are raw honey, aloe, and witch hazel.  We’ve also been know to slather a little of our yogurt on to our faces!

It’s fun for children this age to explore new things with their friends too.  Because these natural options are gentle and do not often cause adverse effects, they are safe for many skin types.  Why not set up a mini spa day for your daughter and some of her friends and let them explore some DIY skin care options?  My daughter and a friend recently experimented with creating a gentle exfoliant of dried milk, fine cornmeal, and ground chamomile buds.  They had a blast while learning healthy habits and supporting each other being natural, confident girls.

Skin Care for Pre-Teens: Raising Natural + Confident Girls

Note: Before using any product on your skin, natural or otherwise, do your research or speak to a skin care professional.Want to learn more about what’s in store-bought products so that you can make informed purchase choices?  Visit Skin Deep for information and safety ratings on products and their ingredients.

Graphic Novel Booklist

By Mariah Bruehl,

Great Graphic Novels...

Rebecca from Thirteen Red Shoes is with us today to share a great list of graphic novels to enjoy with the young readers in our lives.

We adore picture books in our home and believe that you can never have too many! Recently we have become interested in a new genre—the graphic novel.  My son loves the fact that there is a chronological tale told though visual images and that the text that accompanies is fast yet detailed and often tells just snippets of the tale.  You really must use the visual cues to also gain an in-depth understanding of the story.

Here are three different graphic novel series worth exploring…

Tintin has become a firm favorite and we have gathered a collection from our local library to explore.

I do believe however that this series might need to go on the birthday list as he has spend hours pouring over each edition, each time finding new and interesting components which relate to other editions.  The more you explore the more there is to find.

There are also three in one compact editions, which look delightful and perfect for a family traveling.

For those littles who then fall in love with Tintin there is a website dedicated to information about the characters, stories and behind the scene information such as how to draw tin tin yourself!


If your budding readers decide to try their hand at writing graphic novels, be sure to check out our comic strip templates.


Designing Spaces for Children: Movement and Flow

By Mariah Bruehl,


Designing Spaces for Children: Movement and Flow

“From a child’s perspective, everything is an interactive surface with the potential to be sculpted, painted, draped, or molded artistically…. Their play is often a response to subtle variations in the places and sensations that surround them.” – Anita Rui Olds


Have you ever noticed the way children move through a space? Imagine a hallway – at the doctor’s office, the grocery store, or even a typical public school. It’s almost as if a long corridor silently screams to children, “Run”. And, what do they do? Run, of course! Children take cues from the environment and the way space is arranged can have a significant impact on their learning experience. Whether you are designing a classroom or simply creating a corner within your home, you’ll want to consider how the layout encourages movement and creates a natural flow among different areas.


The design of your space will likely be determined by the amount of space you have, the location of doors and windows, furniture, and the type of flooring available to you. Carpet and area rugs provide softness and help define areas while hard surfaces like linoleum or tile are great for “messy” play, like art projects and sensory exploration. A combination of both is ideal. Most classrooms are organized by learning centers, such as areas for block play, art, and science. Determining the type of play that will occur in your space will help you design a floor plan that optimizes learning.

Designing Spaces for Children: Movement + Flow


Here are some tips for considering movement and flow:


o    Think about the functionality of each space. What furniture best suits each area? Seek out flexible furnishings that can grow with your children and accommodate their emerging interests.


o   Avoid setting out materials on the perimeter of the room and instead create small areas that are enclosed on 2 or 3 sides. Children are naturally drawn to small spaces where they can be alone or with one or two others. Small areas encourage focus and attention and appear more manageable.


o    Create clearly defined areas using low shelves and other furniture but take care not to overcrowd the space. You might experiment with hanging plants, artwork, or beaded curtains to create a visual divider between areas.


o   Arrange quiet areas (like reading) apart from louder areas (like block play) to minimize distractions and disruptions.


o   Create wide pathways that allow children to move freely without bumping into one another.


o  Some areas of your space may hold multiple functions, like a kitchen table, so creating a storage system is essential. You might roll out a drop cloth to protect the floor or a table surface.


o   Use baskets and bins to organize and store materials in an attractive way. Check out the following posts for great tips on minimizing clutter and Toy Organization.


Every child is different and our spaces should reflect their growing interests and needs. How does your child move through space? How do you account for movement when creating your spaces for children?


Summer Acrostic Poetry

By Mariah Bruehl,

Summer Acrostic Poetry


This is a seasonal activity that I started when my kids were very young. The beauty of this particular style of poetry is that even young children can successfully compose a poem as they don’t need to know about proper grammar and sentence structure.


What is an acrostic poem?

An acrostic poem is a poem that uses the letters in the word to begin each line of the poem. The letters are written in capital letters down, rather than across, like this:

S –

U –

M –

M –

E –

R –


Each line of the poem must start with the capitalized letter, for instance:

S – sunny days

U – under the trees

M – making music,

M – milkshakes and memories

E – everyone together

R – refreshed and relaxed


Here are some easy tips for creating acrostic poems:

  • Have your child brainstorm some ideas (one or two words is fine) about what summer means to them or objects that remind them of summer.
  • Encourage your child to use their own handwriting and try not to jump in and correct their spelling as it adds to the charm of the finished poem!
  • Sign and date the poem on the back so that you can remember which child wrote it and when.
  • Have the entire family participate and read aloud each others poems.

Summer Acrostic Poetry


We like to do this activity at the beginning of every season but it could be done any time of year with any word that has meaning to your child. (Star Wars, Cupcakes, Grandma, Seashore, etc…)


It has been fun to look back on my children’s poems and remember what was most important to them at the time and how their thoughts, interpretations and spelling have matured over the years.


You are welcome to use my printable template here to get your child started or allow them to decide how they want to publish their poem – hand written, computer typed, with or without drawings, etc.

Summer Acrostic Poetry


Some links to websites that talk about acrostic poetry:


Some books about writing poems with children:


Storybooks about poets:


My favorite books of poetry when I was a little girl!

When we were very young / Now we are Six – A.A. Milne and Ernest H. Shepard


5 Things You Can Learn From Your Child

By Mariah Bruehl,

5 Things You Can Learn From Your Child

Nuria from the The Adventures Archive is here today to share some insightful inspiration to all of the grown-ups of the world…

1. Let it go: If you have ever seen a fight in between siblings, you know that their level of emotions goes from 0 to 10 in a split second. Suddenly toys start flying, shouts fill the room, and they say things like “I don’t want to play with you ever again” with deep conviction. But give them half an hour and they will be best friends again like nothing happened. No resentment, no anger. Next time you have a big argument think about your child. You’ll be less reluctant to forgive and forget.

2. Keep your sense of wonder: If you could see the world through your child’s eyes you would see a wonderful, magical place. Kids appreciate the little things, they don’t rush around worrying and everything is exciting to them. When was the last time you stop to smell the roses? Don’t let responsibilities and housework kill your sense of wonder. Spend some time playing with your children and marvel with them at the simplest things.


5 Things You Can Learn From Your Child


3. Don’t be afraid to ask: Children have the ability to ask the questions no one else has thought of and to challenge the assumptions that we, adults, no longer question. Then we grow up and stop asking, because we don’t want to look dumb, or inadequate. However, the fear of “looking unknowledgeable” can create a self-fulfilling prophecy. Remember, the biggest discoveries were done by adults who never stopped asking why.

4. Live like there’s no tomorrow: Every morning, kids jump out of bed and prepare to live the day to the fullest. When a child is having fun nothing else exists. They only know this moment; right here and now, and they seem to understand something that we adults have forgotten: that the present is what counts and that each day is a gift waiting to be discovered.


5 Things You Can Learn From Your Child


5. Be creative: When was the last time you tried something new? Do you stop yourself from doing things differently because you are afraid of other people’s opinions? Children are not. They love taking risks and don’t worry about looking foolish or different. Be like them and start exploring new options. Your creativity will thrive and you’ll have more and better ideas.

SaveSave

Collaborating with Nature

By Mariah Bruehl,

Collaborating with Nature

Kate from An Everyday Story is with us today to share a fun way to bring together an appreciation of nature and our creative spirits…

It started with a stick, “Mummy wouldn’t this stick make a great tree house?…It’s a great shape, but it’s a bit small.” My five year old son wondered to himself how he could make this stick into a tree house… “What if we drew a tree house on top of the stick?” I suggested. He looked a little puzzled at first but then became very excited once I explained.

Collaborating with Nature

When you start looking around at all the differently shaped leaves, sticks and flowers in our yards, you can’t help but be inspired. A small round leaf could be a balloon, a long leaf could be a boat sailing on gentle seas or a snippet from a pine tree could be beautiful Christmas tree.

The tree house was just the beginning. Soon we had pages of pictures, as each different leaf or petal inspired different creations. We wanted to keep them but sadly the transient nature of petals and leaves means they will eventually wilt. For now we have pictures to remember them by.

Collaborating with Nature

A Playful Pen Pal Project

By Mariah Bruehl,

A Playful Pen Pal Project

Monique of Green Acorns is with us today with to share some great tips on getting our young writers started with Pen Pals.

Would you like a fun writing activity for your child to engage in during the summer (or anytime)?  Whether you are trying to encourage a reluctant writer, nurture communication skills, or strengthen a sense of connection with a special person, having a pen pal is a great activity for kids of all ages.

A Playful Pen Pal Project

If your child is comfortable writing about themselves and asking others questions about themselves in a letter form, that’s great!  For some children, however, that can seem a bit overwhelming or perhaps they’re just not ready for it.  If that’s the case then this playful pen pal project may be the perfect thing to get them started.

Here’s the idea… Begin by helping your child choose a pen pal.  Starting with someone familiar may help reduce any anxiety and help build confidence.  Print the provided template for your child to use to communicate back and forth with his or her pen pal.  Finding out about a person’s likes is a good way to initially get better acquainted.  An example has been provided for you to help get things underway.   Your child should fill out the copy with the introductory letter to mail to the pen pal and enclose the blank version for the pen pal to fill out and mail back.
Pen Pal Project Template
Pen Pal Project Template – blank; editable version

A Playful Pen Pal Project

The blank template is editable so that you and your child can create your own topics.  Here are some ideas that you and your child can brainstorm five simple questions for:

  • A Day in the Life of My Pen Pal
  • My Pen Pal’s Family
  • My Pen Pal’s Home State/Town
  • My Pen Pal’s Fondest Memories

Creating “top 5” lists is another simple idea.  Keep it fun and engaging to maintain your child’s motivation.  If your child is only writing one or two word answers when responding, that’s okay.  To nurture developing writing skills, work up to having him or her write out a complete sentence.  And do encourage using the letter writing space as well.  It’s perfect for additional ideas, comments, or questions and is a wonderful preface for longer letter writing when your child is ready.

A Playful Pen Pal Project

Once your child has received the first response, it’s time to incorporate the playful twist.  Cut out the circles with the pen pal’s responses and get crafty.  Turn them into a garland that, when strung together, form a representation or story of who your child’s pen pal is.  Every time your child looks at the display he or she will think of that person and feel a special connection.  Don’t forget to encourage the pen pal to do the same!

Some benefits of having a pen pal:

  • Practice reading skills
  • Develop communication skills
  • Improve writing skills
  • Build sense connection and friendship
  • Incorporate geography
  • Encourage thoughtfulness
  • Practice patience
  • Make time to slow down

I hope your child will love having and being a special pen pal and that this project helps set the course for a life-time love of writing and connecting!

Story Cubes for Young Readers

By Mariah Bruehl,

Story Cubes for Young Readers

Rebecca from Thirteen Red Shoes is with us today to share a fun activity to share with the little readers in our lives…


Story cubes are such a wonderful way to engage children in a story and to check for comprehension.  Often when children are beginning to read they are so focused on sounding out unfamiliar words that meaning is lost.  Through working together with your little ones you can help them grasp the key concepts of a story in order to maintain comprehension.

The best part is that they are simple to create!

  1. Choose a familiar story and read it together or listen to your child read to you.
  2. After you have read the story use the cube template download to create a story cube.
  3. A cube has six sections and in each one there is enough room for a sentence focusing on the key components of the story.  I chose to focus on the following six areas for a narrative text however you can make your focus what ever you wish.
    • square 1:  title of the story
    • square 2: setting/ scene
    • square 3: characters
    • square 4: beginning
    • square 5: problem
    • square 6: resolution

Books to use initially as your children get used to the cubes could be familiar fairy tales such as:

As they become more familiar with this learning process you could introduce books that they are unfamiliar with in order to gather their level of comprehension.  With older children you could focus on developing character cubes, one face of the cube for each character in the story or chapter book, or scenes from the text which were significant in the theme of the story.  The possibilities are endless.

You can find the cube template here. There is also an online version in which you can direct children to create a story cube online!